
Why this setup?
I recently started working on a Windows 11 notebook but usually develop on macOS because of its built‑in Linux terminal — it makes following CLI tutorials super easy. Windows users, fear not: WSL2 brings that same Linux command‑line experience to your PC. Pair that with Docker and DDEV, and you’ve got a rock‑solid local Drupal setup running in minutes.
1. Install WSL2 + Ubuntu
WSL2 stands for Windows Subsystem for Linux 2. It’s a feature in Windows that lets you run a full Linux system (like Ubuntu) inside Windows — without needing a virtual machine or dual boot.
In simple terms:
WSL2 lets you use Linux commands and tools on Windows, just like you would on a real Linux machine.
It’s great for web development because most tutorials and tools (like DDEV, Composer, Drush, etc.) are designed for Linux. WSL2 gives you that same environment — fast, easy, and built right into Windows.
Run PowerShell as administrator and execute:
wsl --installThis installs WSL2 and Ubuntu. After rebooting, verify your default distro and WSL version:
wsl.exe -l -vIf Ubuntu isn’t set as WSL2, run:
wsl.exe --install Ubuntu
wsl --set-version Ubuntu 2
2. Install DDEV with Docker CE
DDEV recommends WSL2 + Docker CE for best performance.
DDEV stands for “Docker Development Environments”.
It’s a tool that helps you quickly set up and manage local web development environments, especially for PHP-based sites like Drupal, WordPress, Laravel, etc.
In simple terms:
DDEV lets you run websites on your computer in a clean, isolated way — like a mini server just for your project.
You don’t need to install PHP, MySQL, or Apache manually. DDEV handles it all using Docker under the hood.
In PowerShell (non-admin), run:
Set-ExecutionPolicy Bypass -Scope Process -Force; [System.Net.ServicePointManager]::SecurityProtocol = [System.Net.ServicePointManager]::SecurityProtocol -bor 3072;
iex ((New-Object System.Net.WebClient).DownloadString('https://raw.githubusercontent.com/ddev/ddev/main/scripts/install_ddev_wsl2_docker_inside.ps1'))
This script:
- Preps Ubuntu for Docker CE
- Installs DDEV inside WSL2
- Doesn’t require Docker Desktop
You can re-run it anytime without breaking anything.
3. Use a Better Terminal: Windows Terminal
I highly recommend installing Windows Terminal (free in the Microsoft Store). It offers modern features like tabs, copy/paste shortcuts, and Unicode support — much friendlier than the default Ubuntu terminal.
4. Optional: Make Your Shell Awesome with Zsh & Oh My Zsh
Zsh stands for Z Shell.
It’s a powerful alternative to the default terminal shell called Bash (used in Linux and macOS).
In simple terms:
Zsh is like a smarter, more user-friendly version of the command line.
It has cool features like:
- Auto-suggestions while you type
- Easier navigation
- Better customization
Oh My Zsh is a free, open-source tool that makes Zsh even better.
In simple terms:
Oh My Zsh adds themes, plugins, and shortcuts to Zsh to make your terminal look cool and work faster.
You can make your terminal show Git branches, use autocomplete, and much more — all with minimal setup.
Inside your Ubuntu terminal:
sudo apt update
sudo apt install zsh
Then install Oh My Zsh for better auto-completion, themes, and plugins (choose curl or wget):
Install Oh My Zsh via curl
sh -c "$(curl -fsSL https://raw.githubusercontent.com/ohmyzsh/ohmyzsh/master/tools/install.sh)"(Or) Install Oh My Zsh via wget
sh -c "$(wget https://raw.githubusercontent.com/ohmyzsh/ohmyzsh/master/tools/install.sh -O -)"Zsh gives you handy features like:
- Type a folder name (e.g. Documents) instead of cd Documents
- **/foo.txt finds files in subfolders
- Tab cycles through similar file/folder names
Plus tons of plugins like Git-enhanced prompts, syntax highlighting, and more.
5. Create Your Drupal Project with DDEV
In your projects folder:
mkdir my-drupal-site && cd my-drupal-site
ddev config --project-type=drupal10 --docroot=web
ddev start
This spins up a Docker container with PHP, MySQL, Apache, and provides a URL like https://my-drupal-site.ddev.site.
Install Drupal:
ddev composer create-project drupal/recommended-project .
ddev composer require drush/drush
ddev drush site:install --account-name=admin --account-pass=pass
6. Add Useful Modules
Devel & Devel Generate – for inspecting services and dummy content:
ddev composer require 'drupal/devel:^5.3'
ddev drush en devel
ddev drush devel:services
Generate Users, Tags, and Content
The Devel Generate module includes custom Drush commands that let you quickly create demo users, tags, and content.
ddev drush en devel_generate
ddev drush devel-generate-users 10
ddev drush devel-generate-terms 20 --bundles=tags --max-depth=1
ddev drush devel-generate-content 25
Admin Toolbar – improved navigation:
ddev composer require 'drupal/admin_toolbar:^3.6'
ddev drush en admin_toolbar
ddev drush cr
7. Set Up Xdebug for Debugging
Xdebug is a tool that helps you debug PHP code. It shows you detailed error messages and lets you pause your code to see what’s happening step by step.
With Xdebug, you can:
- Spot bugs more easily
- Track variable values while your code runs
- See where errors happen in your code
It’s especially helpful when used with an IDE like PhpStorm or VS Code.
DDEV includes Xdebug by default (it’s disabled for speed). Use these commands:
ddev xdebug on       # enable debugging
ddev xdebug off      # disable
ddev xdebug toggle   # toggle
ddev xdebug status   # check current status
Inside your Drupal root folder create the .vscode folder:
mkdir .vscode && cd .vscodeInside the .vscode folder create the launch.json file with the following code:
{
// Use IntelliSense to learn about possible attributes.
// Hover to view descriptions of existing attributes.
// For more information, visit: https://go.microsoft.com/fwlink/?linkid=830387
"version": "0.2.0",
"configurations": [
    {
        "name": "Listen for XDebug",
        "type": "php",
        "request": "launch",
        "port": 9003,
        "pathMappings": {
          "/var/www/html": "${workspaceRoot}"
        }
    },
    {
        "name": "Launch currently open script",
        "type": "php",
        "request": "launch",
        "program": "${file}",
        "cwd": "${fileDirname}",
        "port": 9000
    }
]
}
Example: Using XDebug to help identify the form_id
1. Set a breakpoint:
/**
* Implements hook_form_alter().
*/
function dtv_form_alter(&$form, \Drupal\Core\Form\FormStateInterface &$form_state, $form_id) : void {
[* Breakpoint here!]  $test = true;
}
2. Start the debugger in your IDE.
ddev xdebug onIn VSCode go to the “Run and Debug” tab and click the play icon “Listed for XDebug”.
Then go to the homepage where the form search input exists and clear the Drupal cache to reload the page.
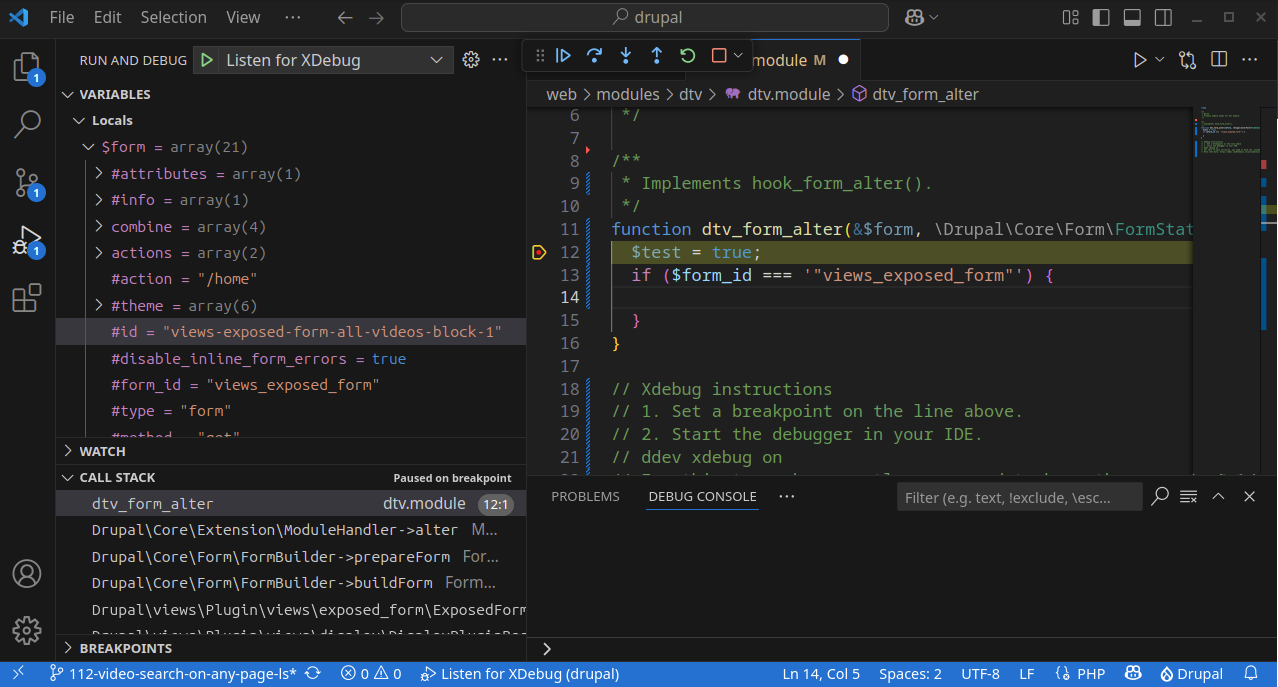
VScode will popup automatically and show helpful information about the existing variables:
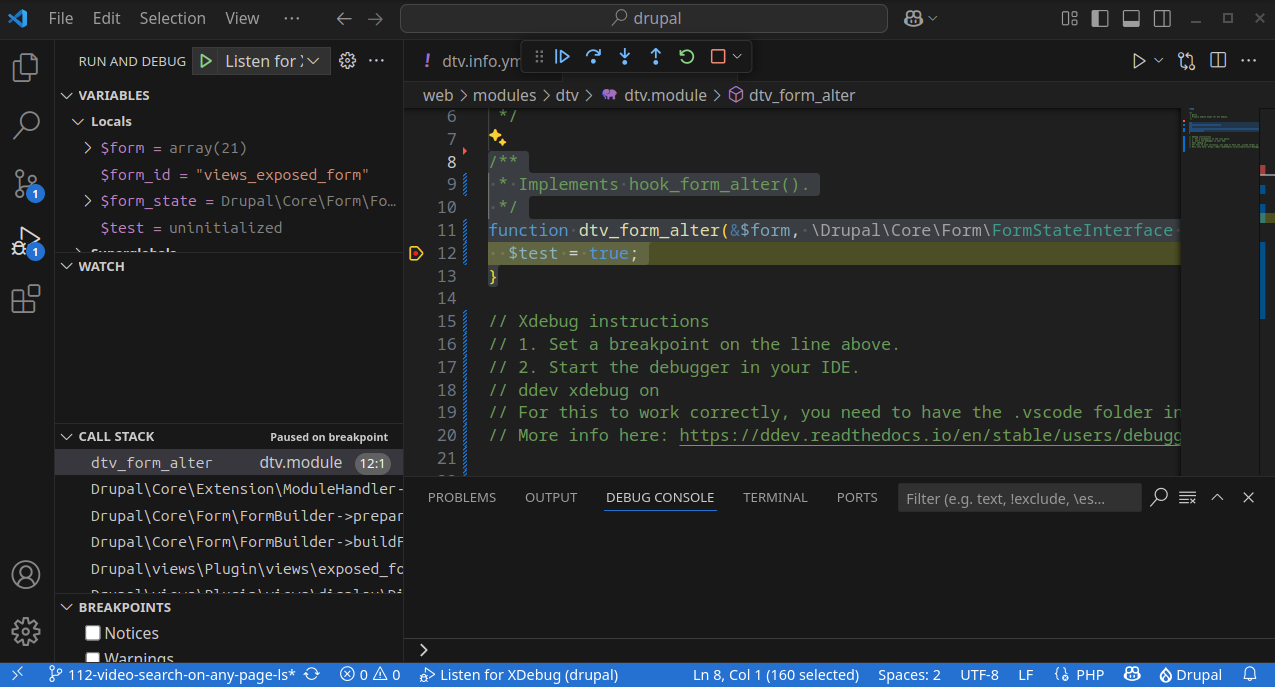
Now we know that the value of the $form_id variable for this form element is “views_exposed_form”.
We can also see that the $form array has an #id value that we can use (“views-exposed-form-all-videos-block-1“):
To turn off XDebug use:
ddev xdebug off8. Check/Lint your code with PHP_CodeSniffer (phpcs)
When writing custom modules, it’s important to follow Drupal’s coding standards. A tool called PHP_CodeSniffer (or phpcs for short) can help you do that automatically.
What is phpcs?
phpcs is a tool that checks your PHP, JavaScript, and CSS files for formatting issues and common mistakes. This process is called linting. It helps you write clean, consistent code and is widely used in the Drupal and PHP communities.
Rule sets for Drupal
To check Drupal code properly, phpcs needs special rules. There are two rule sets:
- Drupal – Checks for general Drupal coding standards.
- DrupalPractice – Checks for common mistakes module developers make.
How to install
You can install the Drupal coding standards and phpcs using Composer:
ddev composer require --dev drupal/coderThis will install both phpcs and the Drupal coding rules.
How to run phpcs
To check your custom module’s code, run:
./vendor/bin/phpcs --standard=Drupal,DrupalPractice web/modules/custom/your-custom-module/This will scan your module and show you any problems with the code style.
Example
For example, to check a module named permissions_by_path, use:
./vendor/bin/phpcs --standard=Drupal,DrupalPractice web/modules/custom/permissions_by_path/Automatically fix some issues
You can also automatically fix many of the code style problems with this command:
./vendor/bin/phpcbf --standard=Drupal,DrupalPractice web/modules/custom/permissions_by_path/Conclusion
With WSL2, DDEV, Docker CE, and a few tweaks, you’ve got a powerful, fast, and familiar Linux development workflow on your Windows machine. Add Zsh, debug tools, and code linting, and you’re fully set up to build Drupal 10/11 sites like a pro.
Try it out — once everything is installed, you’ll be amazed how easy it is to go from zero to Drupal in just a few commands. Happy coding! 🚀