Table of Contents
- Setting Up Your Local Drupal 10/11 Dev Environment with Docker and DDEV
- Initialize a New Git Repository to Start Tracking Your Code Changes
- Set Up a Dev Branch for Your Drupal Project in Git
- Create and Configure Your LIVE and DEV Drupal Websites on Shared Hosting
- Database Creation and Domain Directory Configuration for LIVE and DEV
- Match the Same PHP Version Between Your Local, DEV, and LIVE Websites
- Make Sure You Can Connect to Your Shared Hosting Server via SSH
- Install Composer Globally (Optional)
- My Drupal Folder Deployer Bash Script
- Configure the Database connection in your Drupal settings.php for your DEV and Live sites
- Create a Database Dump of Your Local Drupal Website
- Commit and Push Your Changes to Your Repository
- Finish Setting Up Your DEV and LIVE Websites
- Deploy the Missing Drupal Folders to Your DEV Website
- Deploy the Missing Drupal Folders to Your Live Website (PROD)
- Conclusion
Objective
In this tutorial, you’ll learn how to build a complete and reliable Drupal 10/11 development workflow that works even on a standard shared hosting account (like DreamHost Shared Unlimited).
Shared hosting environments are limited — you don’t get root access, Composer can be slow or break, and managing multiple environments (local → staging → production) can feel complicated.
But with the right tools, you can still create a professional and efficient workflow that is easy to maintain and doesn’t rely on complex server setups.
To make this possible, we’ll use:
- DDEV to create a fully isolated and repeatable local environment for development.
- A lightweight Bash deploy script to safely push code and configuration changes to your DEV and PROD websites on shared hosting.
With just a few commands, you’ll be able to:
- Develop new features locally in DDEV
- Push your changes to your DEV site for testing
- Deploy those same changes to your live site with the exact same script
By the end of this tutorial, you’ll have a streamlined, safe, and easy-to-use Drupal workflow that lets you deploy configuration changes, modules, themes, and new features from your local machine to your DEV and PROD environments without stress or guesswork.
Prerequisites
Before getting started, make sure you have:
✔ DDEV and Docker installed
These tools provide you with a complete local Drupal environment (PHP, MySQL, web server, mailhog, etc.) inside Docker containers — without installing anything directly on your computer.
Docker Installation Guide
https://docs.docker.com/get-started/get-docker
DDEV Installation Guide
https://docs.ddev.com/en/stable/users/install/ddev-installation/
✔ A Linux-based terminal environment
If you’re using Windows, you’ll need WSL (Windows Subsystem for Linux), which lets you run Linux commands and tools directly in Windows.
Microsoft WSL Installation Guide:
How to Install Linux on Windows with WSL
If you want a detailed walkthrough of setting up Drupal locally on Windows with DDEV, you can follow my dedicated step-by-step tutorial:
Quick & Easy Drupal 10/11 Dev Environment on Windows with DDEV & WSL2
✔ A shared hosting account
This tutorial uses DreamHost Shared Unlimited, but any typical Linux-based shared hosting service should work. You need the ability to:
- Create subdomains
- Create MySQL databases
- Enable SSH access
- Clone a Git repo
DreamHost documentation for reference:
DreamHost Shared Unlimited
https://help.dreamhost.com/hc/en-us/articles/34357904873108-Shared-Unlimited-hosting-overview
Setting Up Your Local Drupal 10/11 Dev Environment with Docker and DDEV
Setting up Drupal locally used to be complicated — you had to install PHP, MySQL, Apache, and configure everything manually. With Docker and DDEV, all of this becomes almost automatic.
In just a few minutes, you’ll have a complete, isolated Drupal environment that behaves exactly like a real server.
Let’s walk through the setup step by step.
Step 1: Create a New Drupal Project with DDEV
Open your Linux terminal and create a new directory for your project.
For this tutorial, we’ll call the project drupal:
mkdir drupal && cd drupalNow initialize the project with DDEV:
ddev config --project-type=drupal10 --docroot=webThis command tells DDEV:
- We’re building a Drupal 10/11 project
- The Drupal installation will live inside a folder named web
- DDEV should generate all required configuration files
DDEV creates a .ddev folder where it stores its settings.
Step 2: Start the DDEV Environment
Start DDEV with:
ddev startDDEV will automatically:
- Start the necessary Docker containers (PHP, Apache, MySQL, Mailhog, etc.)
- Set up SSL certificates for local HTTPS
- Generate a nice local URL, for example:
When the setup finishes, DDEV will show a success message letting you know your environment is ready.
Step 3: Install Drupal
Next, we’ll download and install Drupal using Composer and Drush.
Download Drupal with Composer:
ddev composer create-project "drupal/recommended-project" .Install Drush:
ddev composer require drush/drushInstall Drupal with Drush:
ddev drush site:install --account-name=admin --account-pass=securepasswordYou now have a fully installed Drupal site inside your DDEV environment.
Open it in your browser: https://drupal.ddev.site
Step 4 (Optional): Install Helpful Development Modules
These modules aren’t required, but they make development easier and faster — especially when testing themes, layouts, and custom functionality.
Devel Module
The Devel module provides useful developer tools like service inspection and dummy content generators.
Install and enable Devel:
ddev composer require 'drupal/devel:^5.4'
ddev drush en devel
List all available services:
ddev drush devel:servicesGenerate Dummy Content
The Devel Generate submodule lets you instantly create users, taxonomy terms, and nodes — perfect for testing themes or views.
Enable the submodule:
ddev drush en devel_generateCreate sample data:
ddev drush devel-generate-users 10
ddev drush devel-generate-terms 20 --bundles=tags --max-depth=1
ddev drush devel-generate-content 25
Your site will now contain realistic test content (articles, users, tags, etc.) that you can use while building and testing.
Admin Toolbar Module
The Admin Toolbar module replaces the default Drupal toolbar with a much more usable dropdown menu, making the admin area faster to navigate.
Install and enable it:
ddev composer require 'drupal/admin_toolbar:^3.6'
ddev drush en admin_toolbar
ddev drush cr
Step 5: Log In as Admin
If you ever get logged out or want a quick way to access the site as an administrator, you can generate a one-time login link:
ddev drush uliThis prints a secure login URL in your terminal. Open the link in your browser and you’ll be logged in immediately.
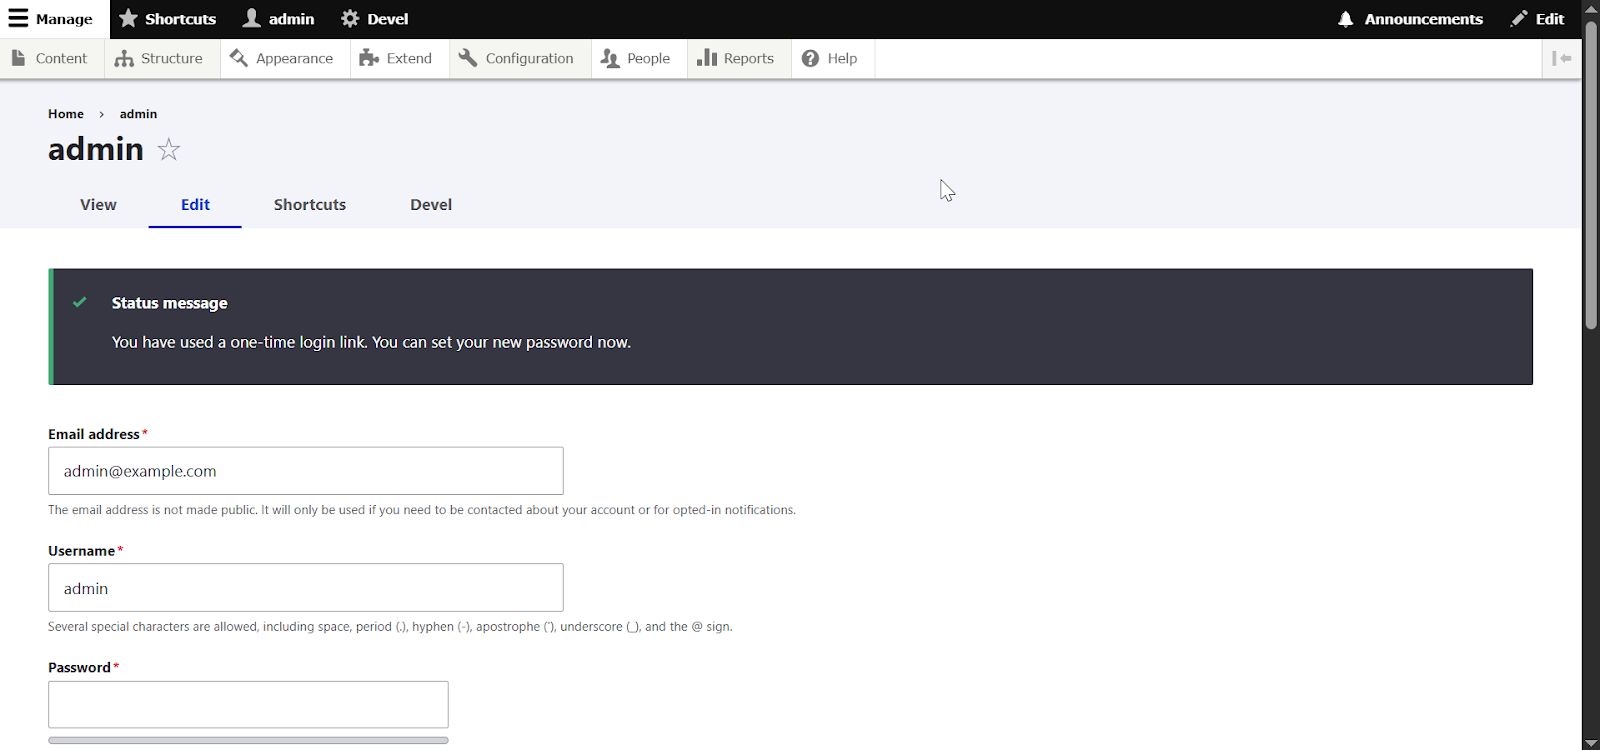
Once inside, it’s a good idea to set your permanent admin username and password.
Initialize a New Git Repository to Start Tracking Your Code Changes
Now that your local Drupal site is up and running, it’s time to start tracking your work with Git.
Version control is essential — it lets you save progress, experiment safely, roll back mistakes, and deploy cleanly to your remote environments.
Let’s set up your Git repository step by step.
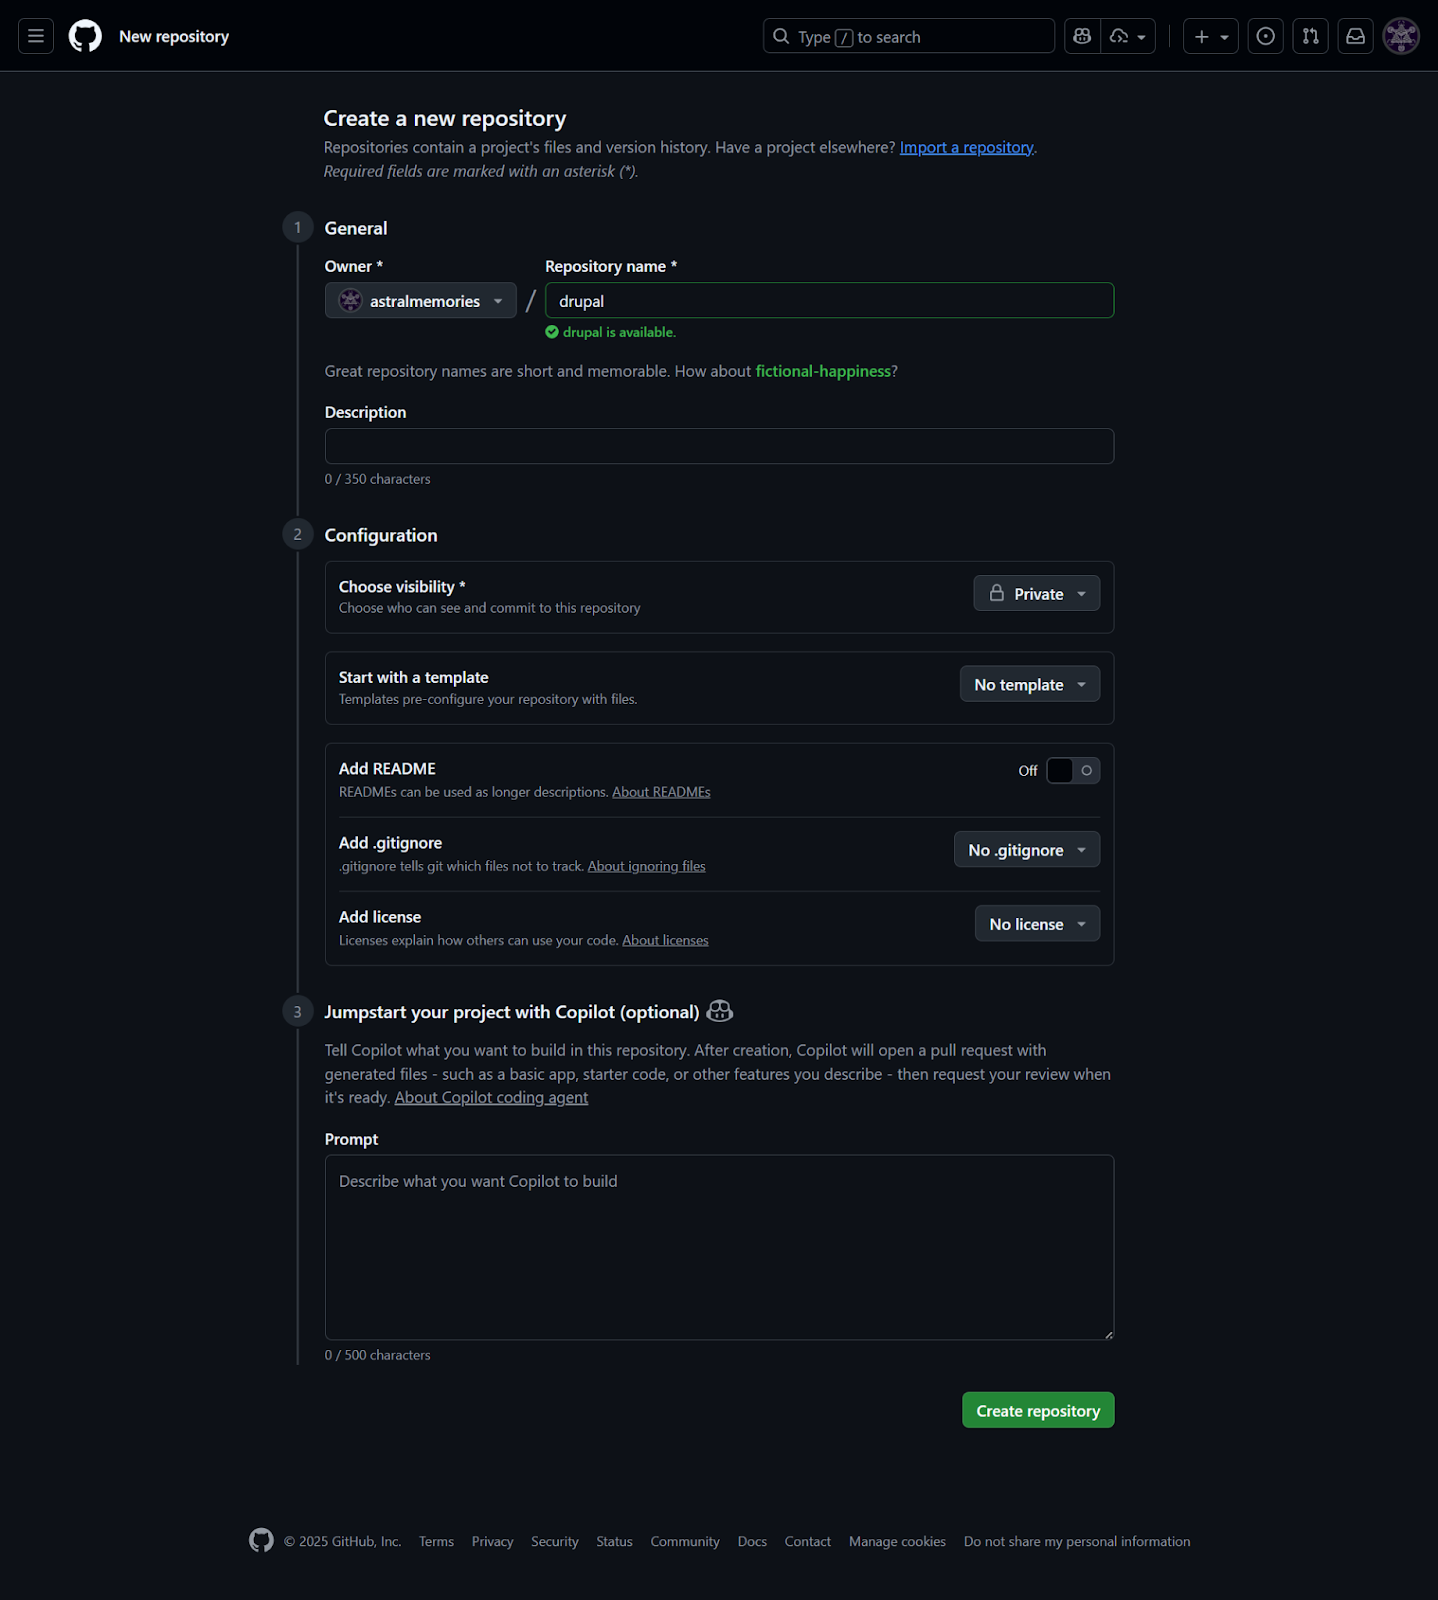
Create a New Repository on GitHub (or GitLab)
- Go to https://github.com/new.
- Choose a name for your project — for example drupal.
- You can also add an optional description and choose whether the project should be private or public.
Important:
Leave the following unchecked/default:
- README
- .gitignore
- License
We’ll add these manually later to make sure everything is configured correctly.
Use SSH Instead of HTTPS
When you connect to GitHub using HTTPS, you need to type your credentials or personal access token every time you push code.
Using SSH keys eliminates this hassle — once the key is added, GitHub automatically trusts your device.
If you don’t already have SSH keys set up, follow this guide:
Connecting to GitHub with SSH
https://docs.github.com/en/authentication/connecting-to-github-with-ssh
Once SSH is ready, you’ll clone and push code using URLs like this:
git@github.com:yourusername/drupal.gitCreate a .gitignore File
A .gitignore file tells Git which files and folders should not be tracked.
This prevents:
- Auto-generated files
- Temporary caches
- Local environment settings
- Sensitive info
- Large folders like /vendor from cluttering your repository.
Move into your project folder:
cd drupalCreate a .gitignore using your preferred editor:
nano .gitignorePaste the following content (this is based on the official Drupal example .gitignore, plus some extra useful rules):
# Files and directories suggested to be ignored by Drupal
# @see https://git.drupalcode.org/project/drupal/-/blob/10.0.x/example.gitignore
/web/core
/vendor/
/web/sites/*/settings.*.php
/web/sites/*/services*.yml
/web/sites/*/files
/web/sites/*/private
/web/sites/simpletest

# Directories specific to this template
/web/libraries
/web/modules/contrib
/web/profiles/contrib
/web/themes/contrib

# OS X
.DS_Store
.AppleDouble
.LSOverride
._*
.Spotlight-V100
.Trashes

# Windows
Thumbs.db
ehthumbs.db
Desktop.ini
$RECYCLE.BIN/

# Eclipse
*.pydevproject
.project
.metadata
tmp/**
tmp/**/*
*.tmp
*.bak
*.swp
*~.nib
local.properties
.classpath
.settings/
.loadpath
*.launch
.externalToolBuilders/

# CDT / PDT
.cproject
.buildpathk

# Emacs
*~
\#*\#
/.emacs.desktop
/.emacs.desktop.lock
*.elc
auto-save-list
tramp
.\#*

# IntelliJ / PhpStorm
.idea/
atlassian-ide-plugin.xml

# XHProf
xhprof_*

# Sass
.sass-cache
*.css.map

# Netbeans IDE
nbproject
nbproject/*

# DrupalVM
.vagrant/

# DevDesktop
*.dd

# NPM
npm-debug.log

# Drush 9 Checksums
drush/sites/.checksums

# Deprecation detector rules
.rules

# PHPCS
.phpcs-cache

# PHPUnit
.phpunit.result.cache

# Drupal check report.
drupal-check-report.xml

# Local files
local.settings.php
local.drush.yml
local.site.yml
local.services.yml
*.local
local.blt.yml

# oauth keys
oauth_keys/

# env-file
/.env*

# .htaccess
.htaccess
This ensures that only the files you intend to track are committed.
Save and close the file.
Initialize Git and Push Your Code to GitHub
Now let’s set up Git locally and push your first commit.
1. Initialize Git
git init2. Rename the Default Branch
Most modern Git platforms use main instead of master:
git branch -m main3. Add All Project Files
git add .4. Commit Your Code
git commit -m "Initial commit"5. Add Your Remote Repository (GitHub)
Replace the username and repo name with your own:
git remote add origin git@github.com:astralmemories/drupal.git6. Push Your Code
git push -u origin mainVerify Your Initial Commit
Visit your GitHub repository in your browser.
You should now see your full Drupal project — minus all the ignored directories listed in .gitignore.
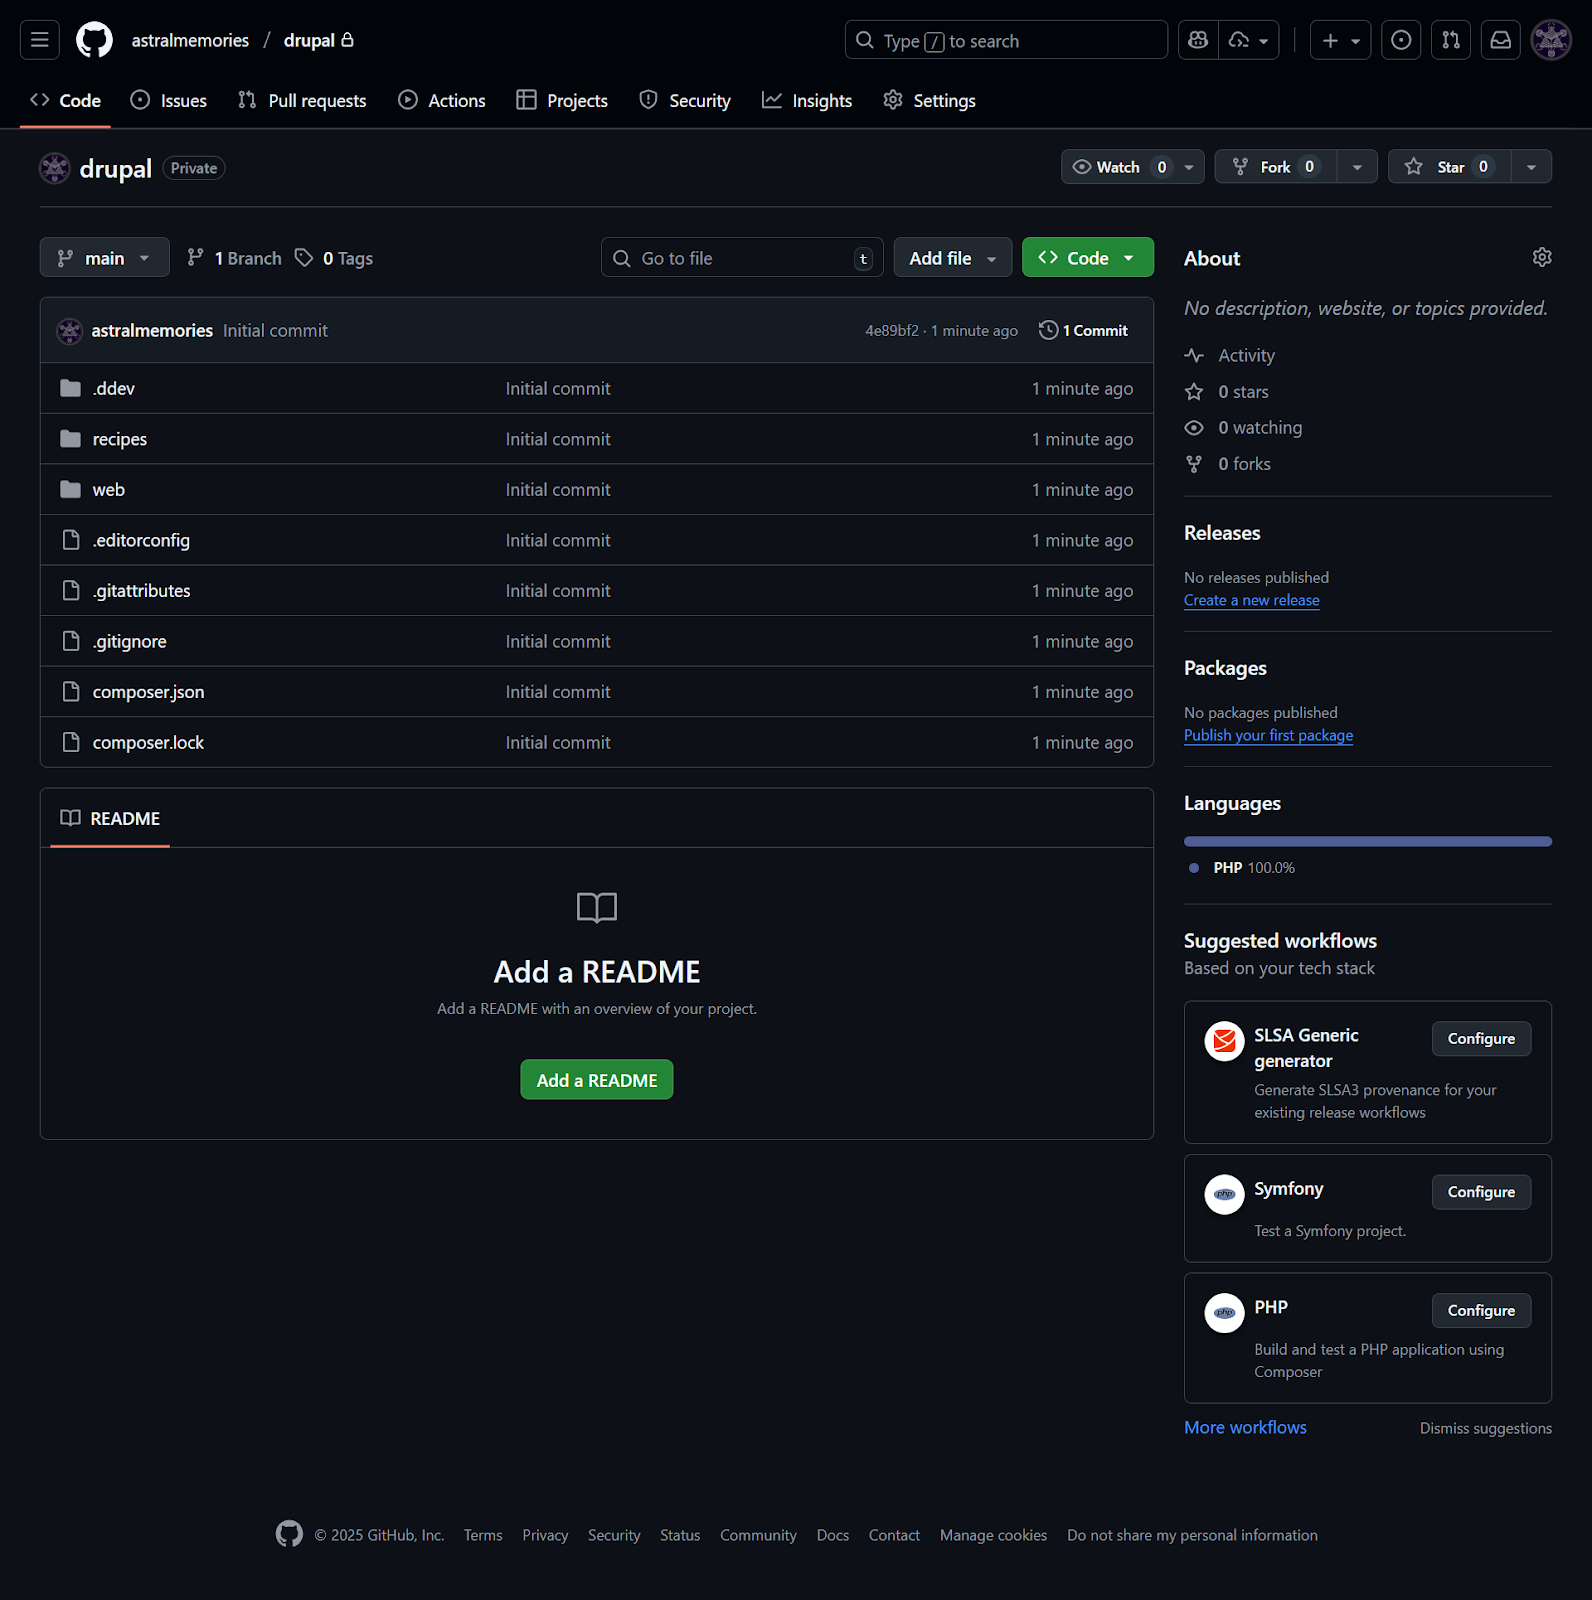
Your project is now safely stored in GitHub and ready for deployments, branching, and all the workflow automation we’ll build in the next sections.
Set Up a Dev Branch for Your Drupal Project in Git
When working on a Drupal site (or any web project), it’s a good idea to organize your code into separate Git branches.
This gives you a safe place to test changes, try new modules, and experiment without risking your live site.
The most common setup is:
- main → your production (live) code
- dev → your development/testing branch
This workflow helps you keep things stable in production while still allowing active development.
Let’s set this up using Git and GitHub.
Step 1: Create and Push the dev Branch
From the root of your project, first make sure you’re on the main branch:
git checkout mainNow create a new branch called dev:
git checkout -b devPush it to GitHub and link it to the remote:
git push -u origin devIf you run:
git branchYou should now see:
* dev
  main
You now have two branches — one for stable production code and one for active development.
Step 2 (Optional): Clone the Repository and Work With Both Branches Locally
If you or another developer wants to clone the repository and work with both branches locally, here’s the recommended workflow:
Clone the project:
git clone git@github.com:astralmemories/drupal.git
cd drupal
Fetch all branches from GitHub:
git fetch originCreate local branches that track the remote ones:
git checkout -b main origin/main
git checkout -b dev origin/dev
Now both your main and dev branches are properly connected to their remote versions.
When working on new features or updates, switch to the dev branch:
git checkout devAnd push your changes when ready:
git push origin devWhy This Branching Strategy Works Well for Drupal
Here are the benefits of using a main and dev branch setup:
✔ Safe testing
You can try new modules, configuration splits, theme changes, and updates on the dev branch without touching your live website.
✔ Cleaner collaboration
If you’re working with other developers, everyone can use the dev branch for active work while keeping main stable.
✔ Predictable deployments
You merge into main only when everything on dev has been tested — giving you a reliable and repeatable deployment workflow.
Create and Configure Your LIVE and DEV Drupal Websites on Shared Hosting
In this section, we’ll set up the LIVE (production) and DEV (testing) versions of your Drupal site on your shared hosting account.
I’ll be using DreamHost Shared Unlimited as the example platform, but don’t worry — the process is nearly identical on most shared hosting providers (Hostinger, SiteGround, Bluehost, Namecheap, etc.). The names of the menus may differ slightly, but the steps are the same.
By the end of this section, you will have:
- A LIVE subdomain ready to host your production Drupal site
- A DEV subdomain ready for testing and staging
- Both sites fully provisioned and ready to receive code from your local DDEV setup
For this tutorial, I’ll be using the following subdomains:
- drupal.astralmemories.com → LIVE / Production
- drupal-dev.astralmemories.com → DEV / Testing
You’ll repeat the same steps for both subdomains.
Create a New Domain or Subdomain
Login to your DreamHost panel and go to: Websites → Manage Websites → “+ Add Website”
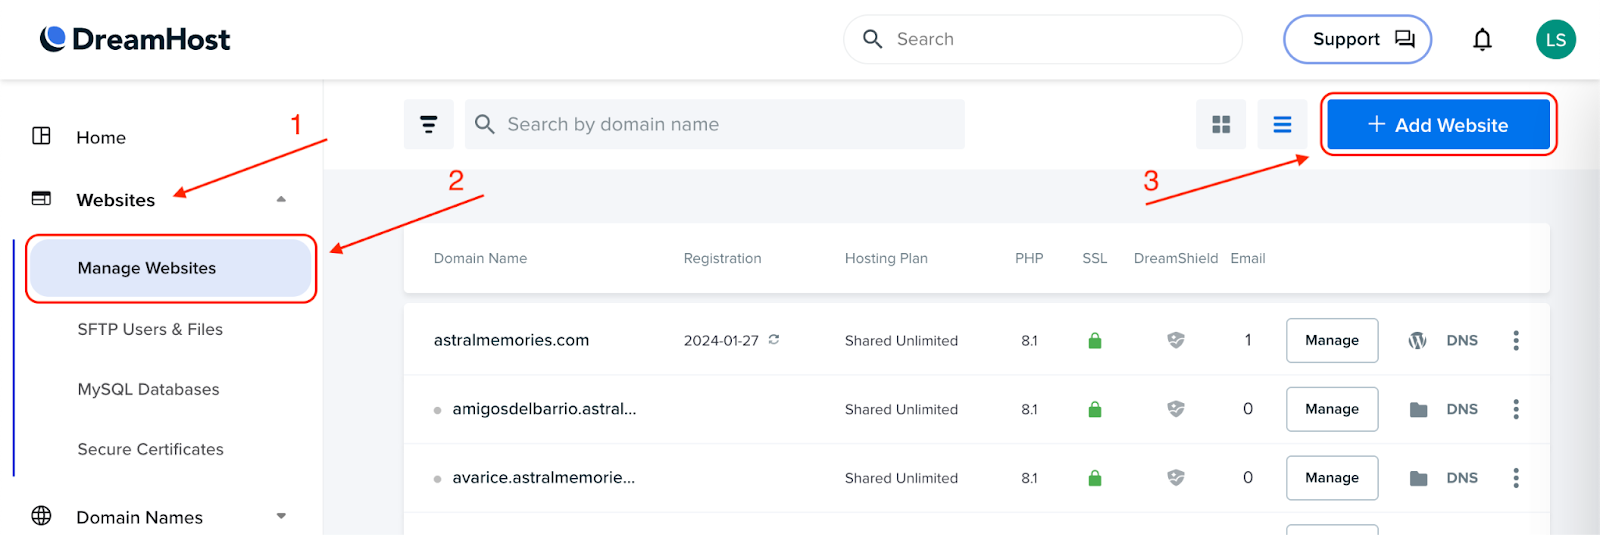
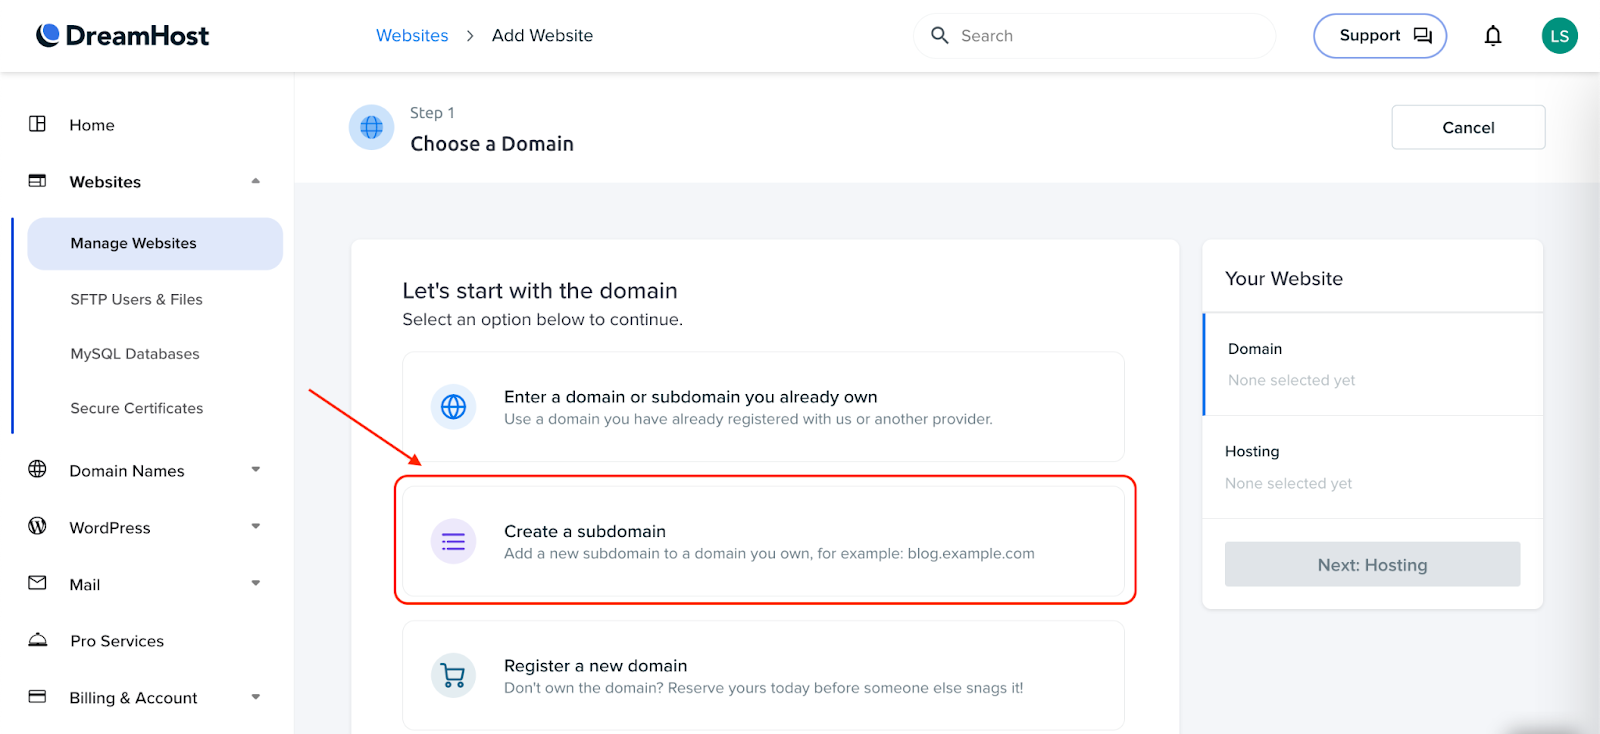
DreamHost gives you three options when assigning a domain to your new Drupal site:
- Use a domain or subdomain you already own
- Create a new subdomain
- Register a new domain
For this tutorial, we’ll choose Create a subdomain.
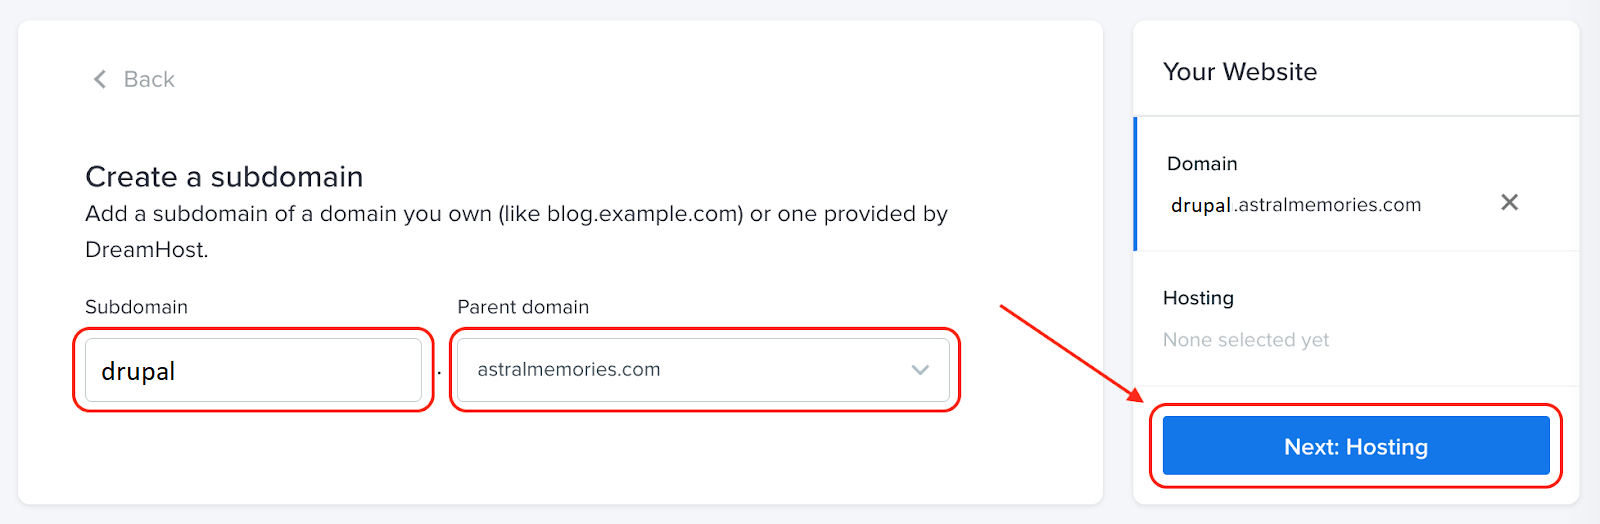
On the “Create a subdomain” page:
- Enter the subdomain name (for example, drupal)
- Choose the parent domain (for example, astralmemories.com)
Then click “Next: Hosting”.
On the next screen, DreamHost will ask which hosting plan you want to connect this domain to.
Choose your shared hosting plan (Shared Unlimited), then click “Set Up Website”.

DreamHost will now create the folder structure, configure DNS, and prepare the environment for your new subdomain.
Wait for the process to finish.
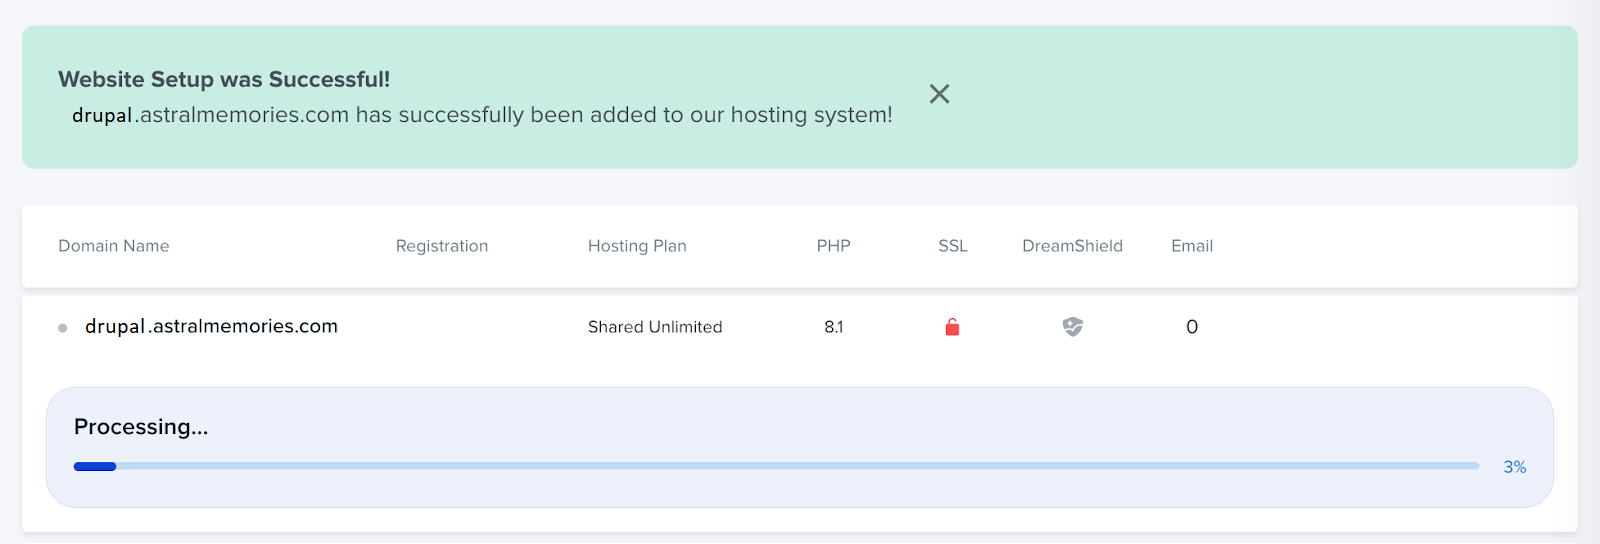
You’ve just created the subdomain for your LIVE/production site.
You will later repeat this same process to create your DEV/testing subdomain (drupal-dev.astralmemories.com).
Add an SSL Certificate to Your Domain/Subdomain (Optional but Recommended)
While SSL isn’t strictly required at this stage, it’s always a good idea to secure your website — even during development.
DreamHost’s Shared Unlimited plan provides free SSL certificates through Let’s Encrypt.
Once your subdomain finishes provisioning:
- Click the ••• menu next to the new domain
- Select SSL Security
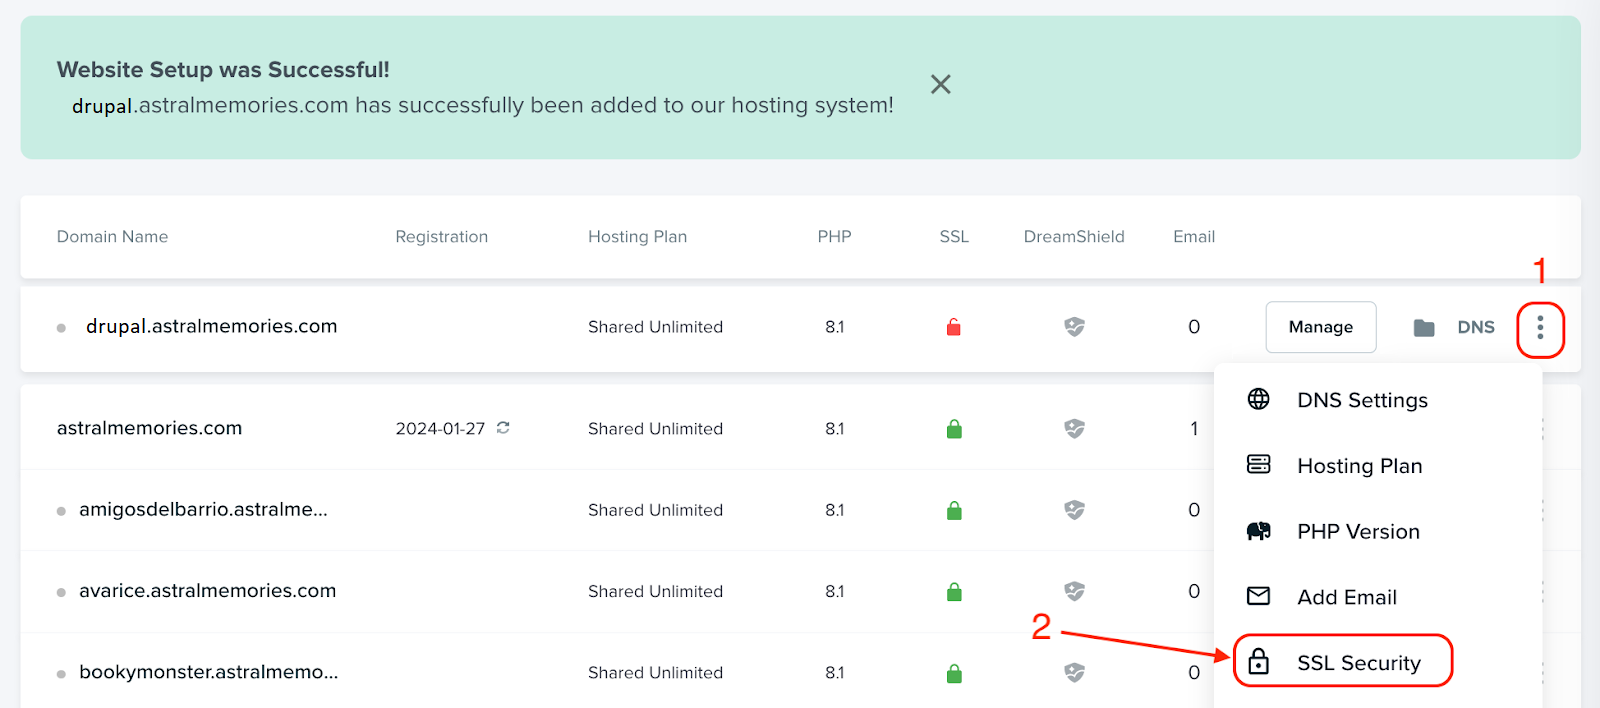
On the next screen, under Free Let’s Encrypt SSL Certificate, click “Select this Certificate”.
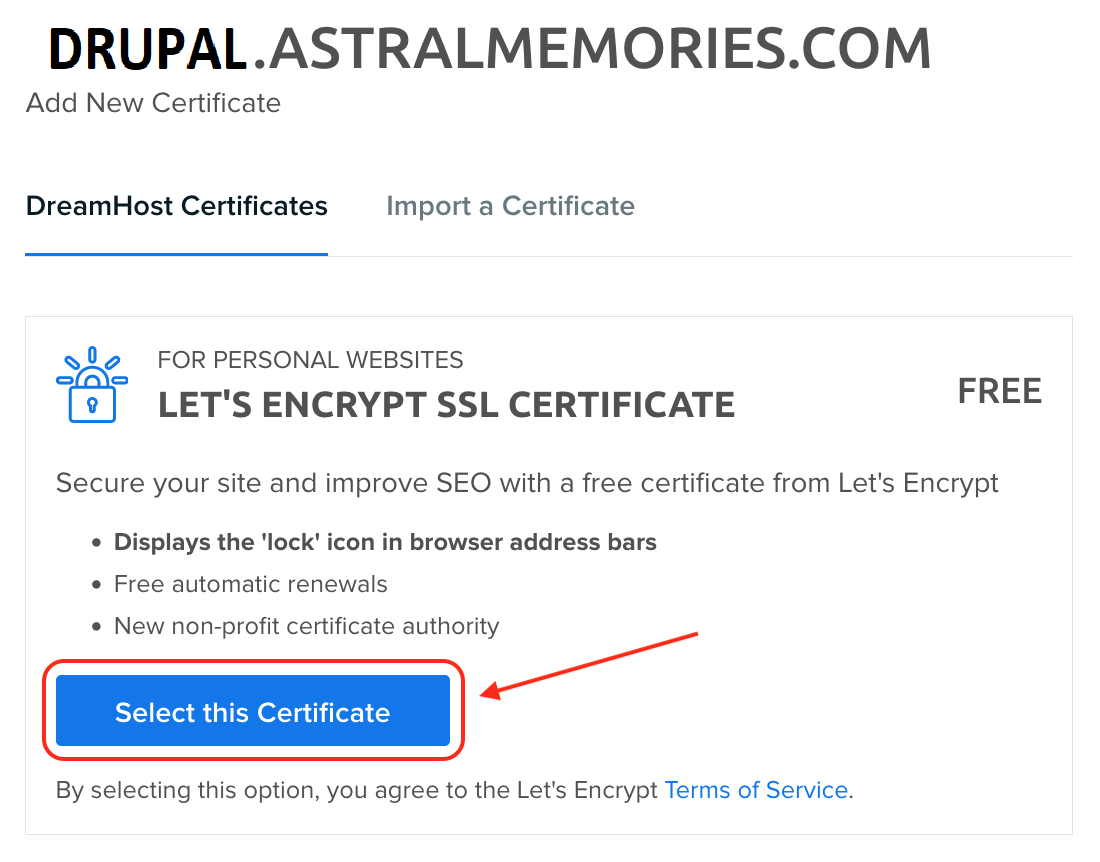
DreamHost will issue the certificate. This usually takes around 5–15 minutes. Once active, all traffic to your site will automatically redirect to HTTPS.
Changing Your Domain’s Username (Optional)
DreamHost allows you to assign each domain/subdomain to a specific user account.
This is optional, but it can help you:
- Keep websites organized
- Separate permissions
- Use different SSH users for different projects
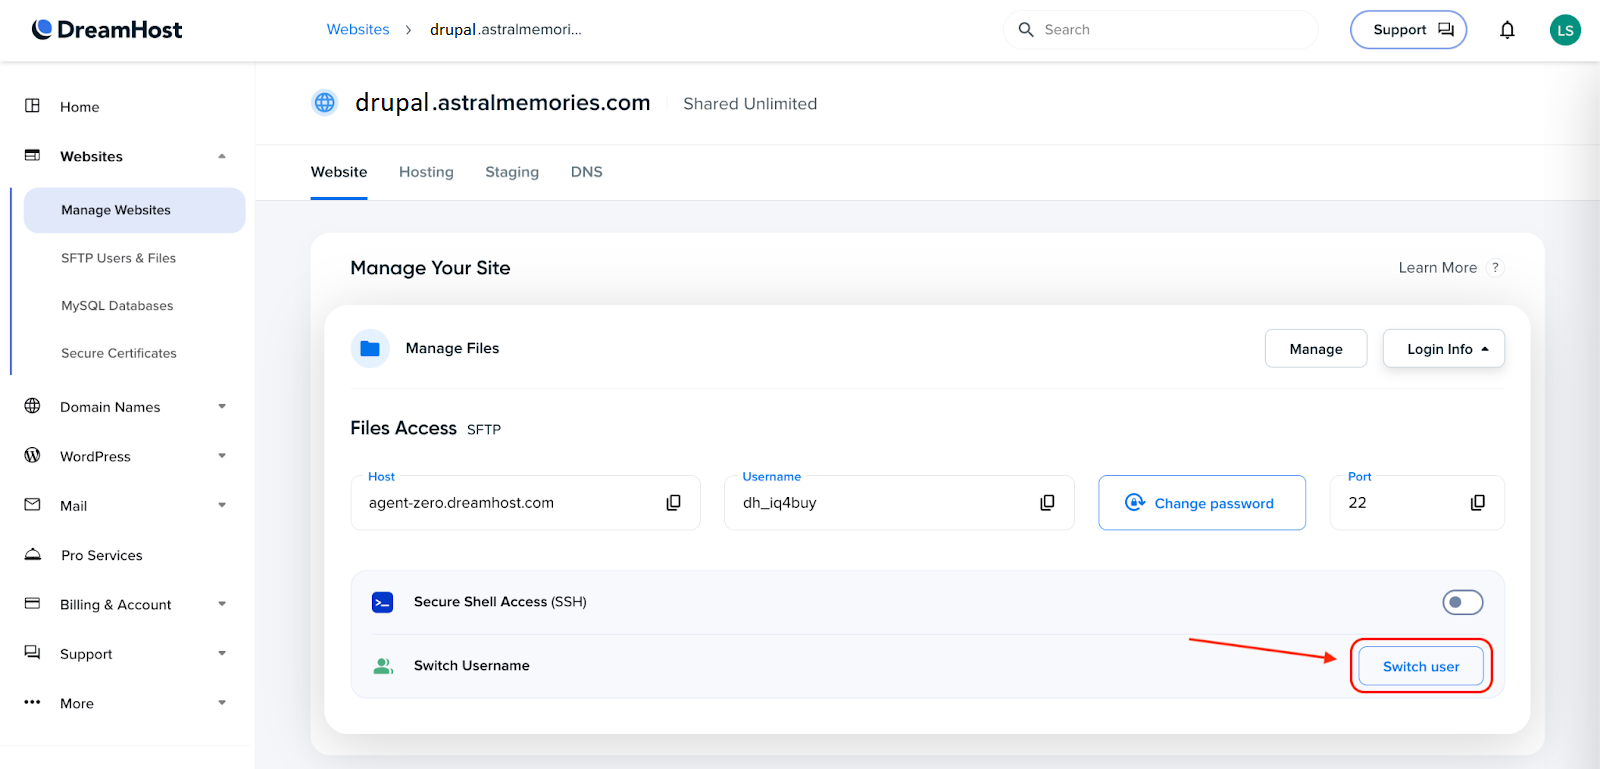
To change the assigned user:
- Go to Manage Websites
- Click Manage next to the domain
- Then click Switch user
From the dropdown list, choose the user you want to assign to this domain.
Click “Save Changes”.
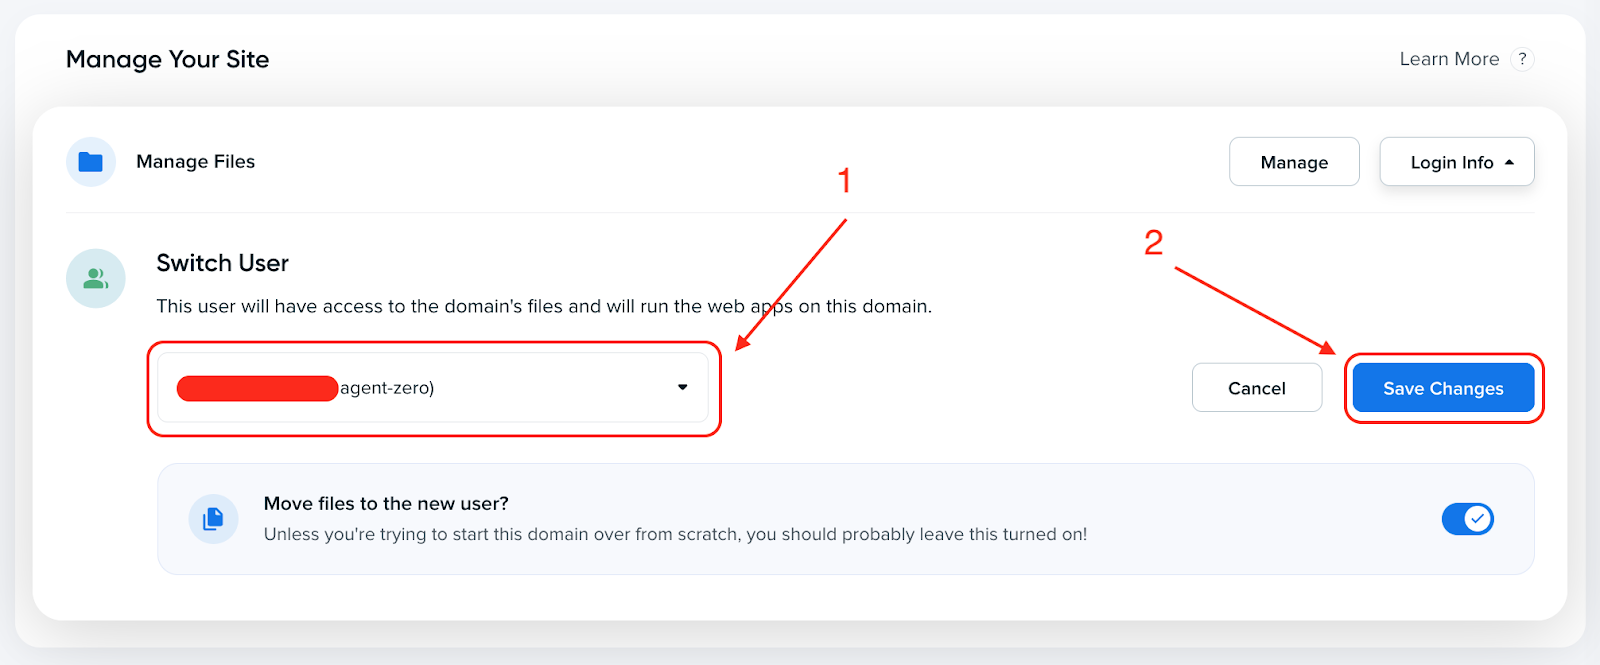
DreamHost will update file ownership and directory structure.
Wait until the process completes before making further changes.

Repeat These Steps for Your DEV Environment
You have now finished creating and configuring the LIVE website:
- drupal.astralmemories.com
Next, repeat the exact same steps to create the DEV version of your site.
For this tutorial, we’ll use:
- drupal-dev.astralmemories.com
This DEV site will be used for:
- Testing module updates
- Trying new features
- Importing configuration changes
- Checking deployments before going live
Once both subdomains are created and configured, you’re ready to prepare their databases and connect them to your codebase.
Database Creation and Domain Directory Configuration for LIVE and DEV
Now that your LIVE and DEV subdomains are set up, the next step is to create a separate MySQL database for each site and point each domain to the correct Drupal webroot.
Having separate databases ensures that:
- Your DEV site can safely test changes
- Your LIVE site stays stable and protected
- Each environment stores its own content, users, and configuration
Let’s start by creating the database for your LIVE site.
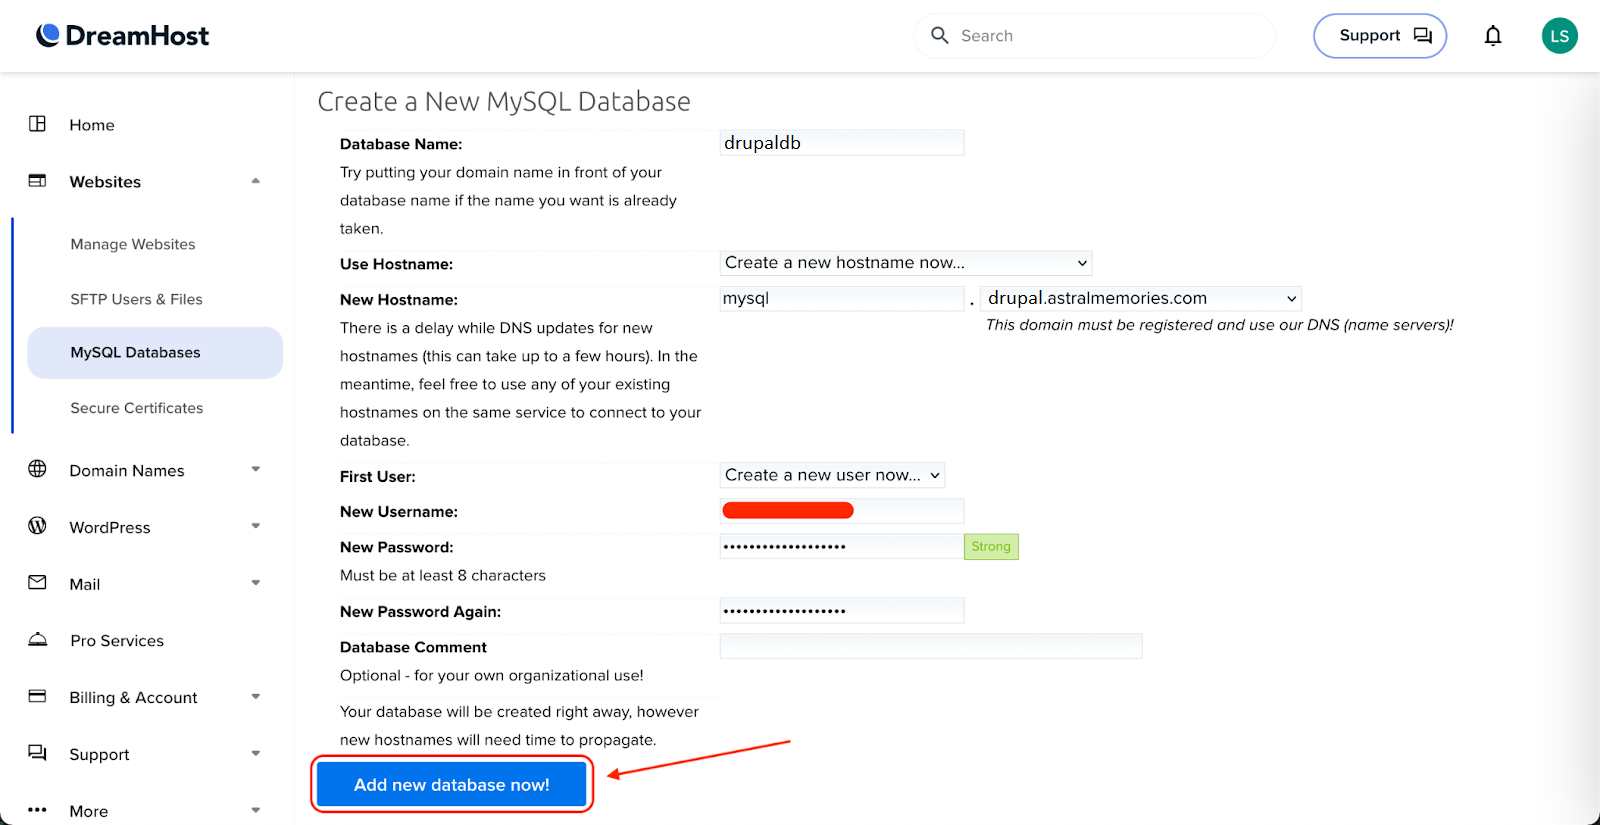
Create the Database for the LIVE Drupal Site
Log in to your DreamHost panel. Navigate to “Websites → MySQL Databases”. Under “Create a New MySQL Database”, fill out the fields as follows:
- Database name: drupal_database
- Use Hostname: Create a new hostname now…
- New Hostname: mysql.drupal.astralmemories.com
- First User: Create a new user now…
- New Username: YOUR_USERNAME
- New Password: CREATE A SECURE PASSWORD
- New Password Again: SAME SECURE PASSWORD
Click “Add new database now!”.
Once DreamHost creates the database and MySQL hostname, your LIVE environment will be ready to connect to Drupal.
Configure the Domain Directory for the LIVE Site
Every new domain or subdomain starts with its own default folder. We need to point your LIVE domain to the web directory inside your Drupal project. This ensures that when someone visits https://drupal.astralmemories.com, the server loads:
drupal.astralmemories.com/webTo update the path:
- Navigate to Websites → Manage Websites
- Find your LIVE domain and click Manage

- Navigate to Additional Settings
- Click the Paths tab
- In Web directory, enter:
drupal.astralmemories.com/web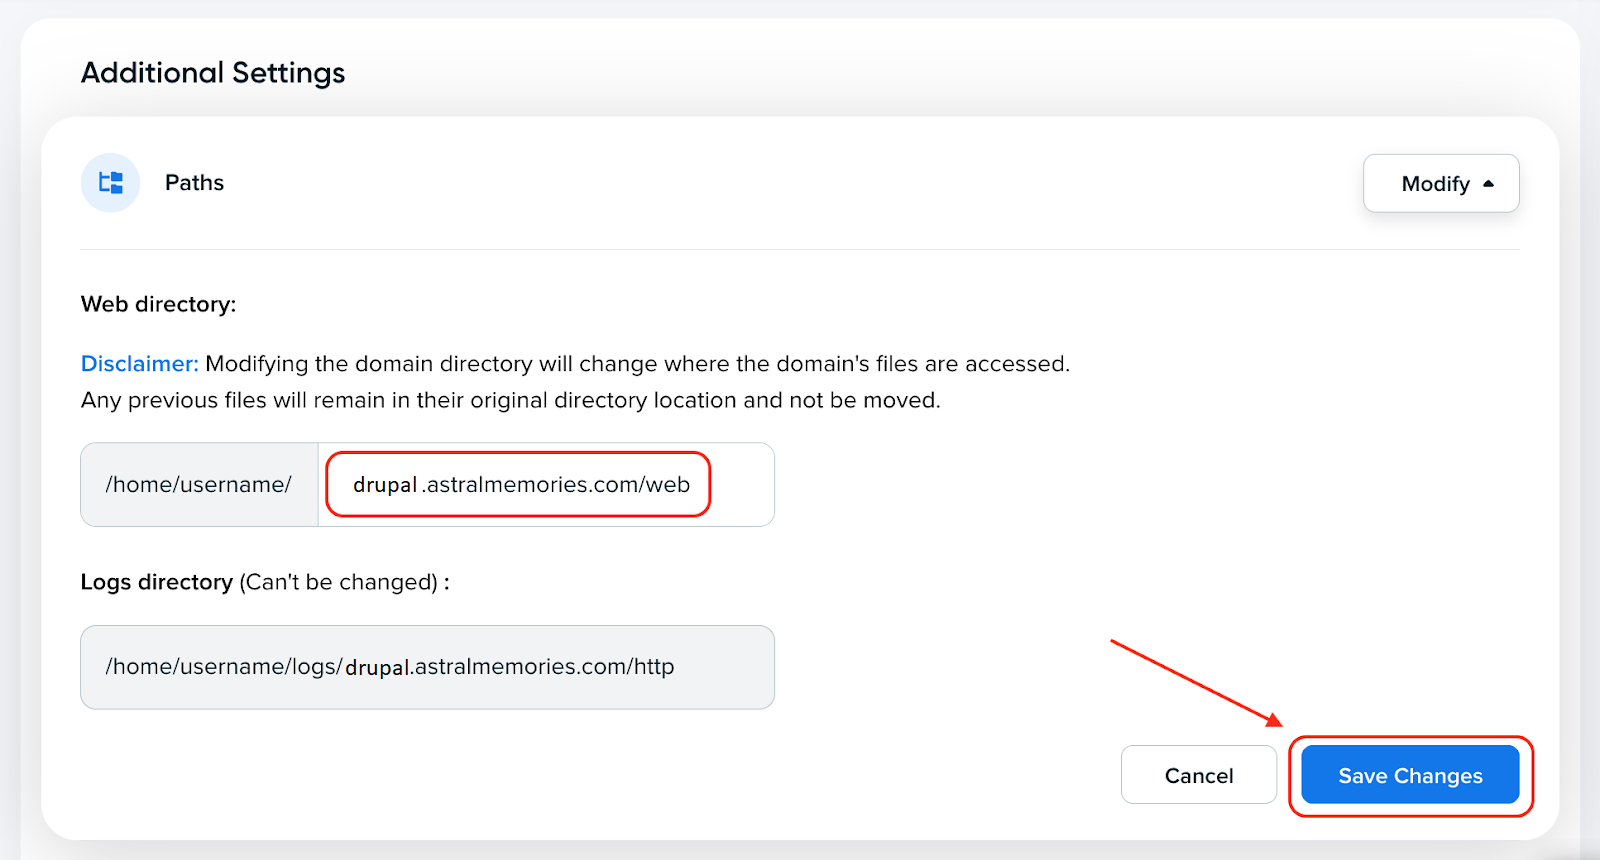
This tells DreamHost exactly where your Drupal site lives.
Repeat These Steps for the DEV Drupal Site
Now we’ll repeat the process for your testing/staging environment.
Create the Database for the DEV Site
Go to Websites → MySQL Databases → Create a New MySQL Database.
Fill in the fields:
- Database name: drupal_dev_database
- Use Hostname: Create a new hostname now…
- New Hostname: mysql.drupal-dev.astralmemories.com
- First User: Create a new user now…
- New Username: YOUR_USERNAME
- New Password: CREATE A SECURE PASSWORD
- New Password Again: SAME SECURE PASSWORD
Click “Add new database now!”.
This creates a completely separate MySQL environment specifically for your DEV site.
Configure the Domain Directory for the DEV Site
Just like the LIVE domain, you need to point your DEV domain to its Drupal web folder.
- Go to Websites → Manage Websites
- Click Manage next to drupal-dev.astralmemories.com
- Navigate to Additional Settings → Paths
- Enter:
drupal-dev.astralmemories.com/webYour DEV and LIVE sites are now completely isolated:
- Each has its own subdomain
- Each has its own database
- Each points to its own Drupal installation directory
This separation is what allows you to safely test changes in DEV before deploying to LIVE.
Match the Same PHP Version Between Your Local, DEV, and LIVE Websites
To avoid unexpected errors, it’s important that all of your environments use the same PHP version (or at least very close). Drupal core, contributed modules, and Drush can behave differently depending on the PHP version—so keeping everything aligned helps ensure that your code works the same everywhere.
In this step, we’ll check which PHP version your local DDEV site is using, and then configure your DEV and LIVE sites on shared hosting to match it.
Check Your PHP Version in DDEV
Inside your local Drupal project folder, run:
ddev drush statusLook for the “PHP version” line.
Here is an example output:
Drupal version   : 11.2.5
Site URI         : https://drupal.ddev.site
DB driver        : mysql
DB hostname      : db
DB port          : 3306
DB username      : db
DB name          : db
Database         : Connected
Drupal bootstrap : Successful
Default theme    : olivero
Admin theme      : claro
PHP binary       : /usr/bin/php8.3
PHP config       : /etc/php/8.3/cli/php.ini
PHP OS           : Linux
PHP version      : 8.3.21
Drush script     : /var/www/html/vendor/bin/drush.php
Drush version    : 13.6.2.0
Drush temp       : /tmp
Drush configs    : /var/www/html/vendor/drush/drush/drush.yml
Install profile  : standard
Drupal root      : /var/www/html/web
Site path        : sites/default
Files, Public    : sites/default/files
Files, Temp      : /tmp
Drupal config    : sites/default/files/sync
In this example, the local environment is running PHP 8.3.21.
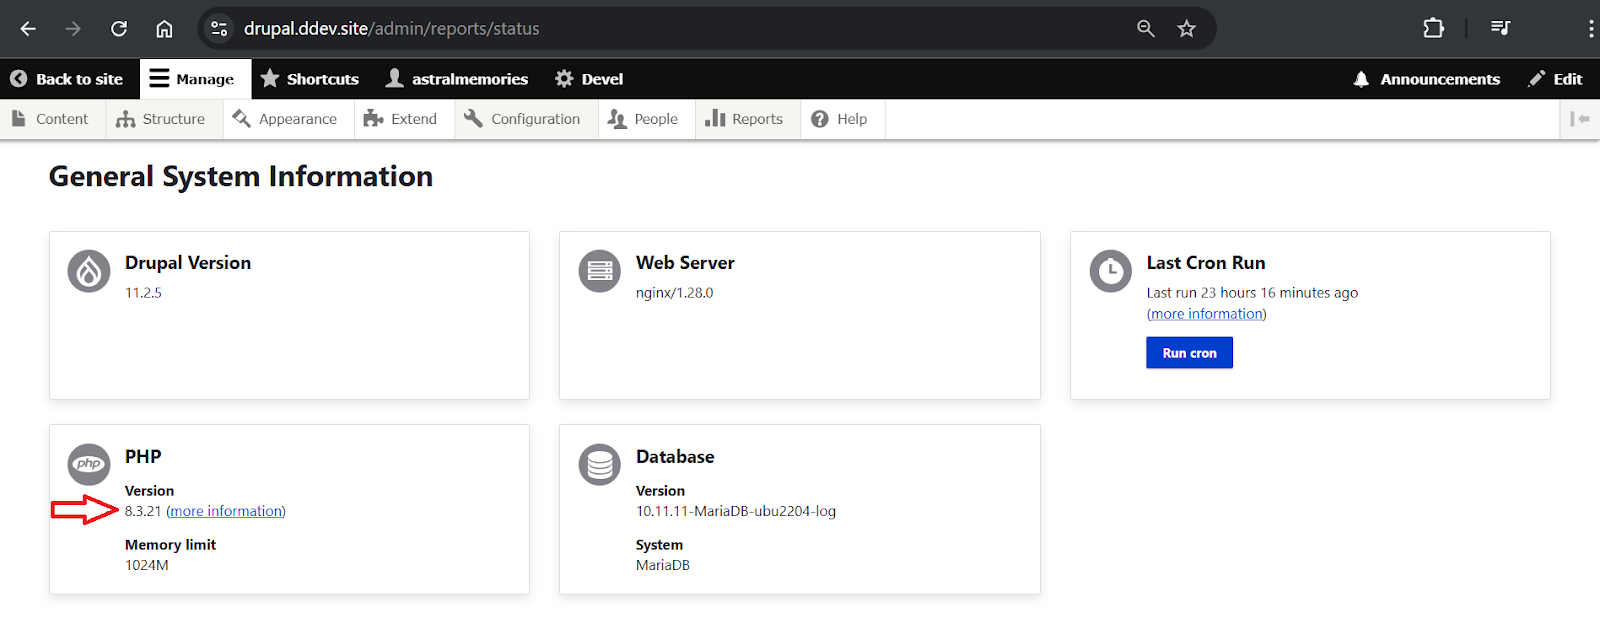
You can also see your PHP version in your Drupal admin UI:
Administration → Reports → Status report
(Located under “General System Information”)
Match the PHP Version on Your DEV and LIVE Websites
Now that you know your local PHP version, the next step is to configure your shared hosting account so that both your DEV and LIVE Drupal sites use the same version.
Using the same PHP version everywhere prevents issues such as:
- Modules working locally but failing on the server
- Drush commands behaving differently
- Random errors caused by missing PHP extensions
- Inconsistent behavior between environments
Change the PHP Version in DreamHost
On DreamHost, you can easily change the PHP version used by each domain or subdomain.
Follow these steps for both:
- drupal.astralmemories.com (LIVE)
- drupal-dev.astralmemories.com (DEV)
Steps:
- Go to Manage Websites in the DreamHost panel.
- Click Manage next to the domain/subdomain you want to update.
- In Grid view, the button appears at the bottom of the tile.
- In List view, it appears on the far right.
- Click the Settings tab.
- Find the PHP section and click the Modify icon.
- Choose the appropriate PHP version from the dropdown menu (make sure it matches your DDEV PHP version).
- Click Change PHP Version.
DreamHost will update the version within a minute or two.
DreamHost’s official documentation on this step:
Change the PHP version of a site
https://help.dreamhost.com/hc/en-us/articles/214895317-Change-the-PHP-version-of-a-site
Make Sure All Environments Match
After updating both subdomains, double-check that:
- Local DDEV
- DEV subdomain
- LIVE subdomain
are all running the same (or very close) PHP version—for example:
PHP 8.3.21This gives you consistency across all environments and prevents unexpected issues during deployment.
Make Sure You Can Connect to Your Shared Hosting Server via SSH
Before we continue configuring your DEV and LIVE Drupal sites, it’s important to verify that you can log in to your shared hosting server using SSH.
We need SSH access because you will:
- Configure the PHP version used by the shell/CLI
- Configure Drush inside each environment
- Run commands that manage your site from the terminal
This ensures the command-line tools on your server (Drush, PHP CLI, Composer, etc.) behave the same way as your local DDEV environment.
Why SSH Is Important for This Workflow
Even though your DEV and LIVE websites already use the correct PHP version for web traffic (via Apache/Nginx), the shell can still be using a completely different PHP version.
For example:
- Website may run PHP 8.3
- Server shell may still use PHP 8.1
This mismatch may cause issues when running Drush or other Drupal-related commands directly on the server.
To avoid errors during deployment, configuration imports, or cron runs, we need everything aligned.
1. Configure SSH Access to Your Shared Hosting Account
Each hosting company has its own process for enabling SSH access. If you’re on DreamHost, follow their guide:
Logging into your DreamPress site via SSH
https://help.dreamhost.com/hc/en-us/articles/360001231463-Logging-into-your-DreamPress-site-via-SSH
Once SSH is enabled, you can log into your server from your terminal.
2. Connect to Your Shared Hosting Server
Open your terminal and connect:
ssh useraccount@yourdomain.comReplace useraccount and yourdomain.com with your actual hosting credentials.
If the connection is successful, you’ll land inside your hosting user’s home directory.
Run:
lsYou should see your DEV and LIVE site folders, something like:
ls

...
drupal-dev.yourdomain.com/
drupal.yourdomain.com/
other-site-folder/
...
This confirms you’re inside the correct server environment.
3. Check the PHP Version Used by the Shell
Now check the PHP version your server’s CLI is using:
php -vExample output:
PHP 8.1.31 (cli) (built: Nov 21 2024 20:15:37) (NTS)
Copyright (c) The PHP Group
Zend Engine v4.1.31, Copyright (c) Zend Technologies
    with Zend OPcache v8.1.31, Copyright (c), by Zend Technologies
If the version matches your Local DDEV website PHP version, you’re done.
If not, you’ll need to change it.
4. Change the PHP Version the Shell Uses
DreamHost has a dedicated guide for this step:
https://help.dreamhost.com/hc/en-us/articles/214202148-Change-the-PHP-version-the-shell-uses
Here’s the short version:
Go to Your User’s Home Directory
Run:
cd ~Edit the .bash_profile File
Open it with nano:
nano .bash_profileIf the file doesn’t exist, nano will create it.
Add the PHP 8.3 Path
Add this line at the end of the file:
export PATH=/usr/local/php83/bin:$PATHThis forces the shell to use PHP 8.3 instead of an older version.
Save and exit:
- Press CTRL + O, then Enter to save
- Press CTRL + X to exit
Reload the Profile
Run:
. ~/.bash_profileThis applies your changes immediately.
Confirm the New PHP Version
Now check again:
php -vYou should see something like:
useraccount@iad1-shared-b7-33:~$ php -v
PHP 8.3.14 (cli) (built: Nov 21 2024 20:15:39) (NTS)
Copyright (c) The PHP Group
Zend Engine v4.3.14, Copyright (c) Zend Technologies
    with Zend OPcache v8.3.14, Copyright (c), by Zend Technologies
useraccount@iad1-shared-b7-33:~$
This means your shell is now using PHP 8.3 — matching your local DDEV, LIVE site, and DEV site.
Why This Matters
By aligning the PHP CLI version across local, DEV, and LIVE:
- Drush commands run consistently everywhere
- Configuration imports/export behave the same
- Deployment scripts work reliably
- You avoid strange server-side warnings or fatal errors
This creates a smooth foundation for the deployment workflow we’ll build later.
Install Composer Globally (Optional)
Composer is the tool Drupal uses to manage all dependencies (core, modules, themes, libraries). You already have Composer available locally through DDEV (ddev composer). However, you can also install Composer on your shared hosting account if you want to manage dependencies directly on your server.
This is optional, and later in this tutorial you’ll see why using Composer on shared hosting is often not ideal.
Why Composer on Shared Hosting Is Optional
Many developers initially think they’ll install modules or update Drupal directly on the server using Composer. That’s possible on VPS or dedicated servers, but shared hosting environments (like DreamHost’s Shared Unlimited plan) have important limitations:
- Low memory: Composer often needs more memory than shared hosting allows.
- Low CPU: Composer commands can take too long and fail.
- Restricted permissions: Some operations require access that shared hosting doesn’t provide.
Because of this, Composer commands often fail during install, update, or dependency resolution.
The better solution
You’ll run Composer locally inside DDEV—where everything is fast and reliable—and then deploy the resulting code (including the vendor folder) to your DEV and LIVE sites.
We’ll build this workflow later in the tutorial.
Still, if you’d like Composer installed for light usage (such as checking versions or running small commands), here’s how to do it.
How to Install Composer on DreamHost (Optional)
DreamHost documentation:
https://help.dreamhost.com/hc/en-us/articles/214899037-Installing-Composer-overview
1. SSH into your hosting account
ssh useraccount@yourdomain.com2. Go to your home directory
cd ~3. Create a directory for Composer
mkdir -p ~/.php/composer
cd ~/.php/composer
4. Install Composer
curl -sS https://getcomposer.org/installer | php5. Add Composer to your PATH
Edit your .bash_profile:
cd ~
nano .bash_profile
Add this line (replace username with your DreamHost username):
export PATH=/home/username/.php/composer:$PATHSave, close, then reload your profile:
. ~/.bash_profile6. Rename the executable
mv ~/.php/composer/composer.phar ~/.php/composer/composer7. Test the installation
composerIf you see the Composer version output, the installation worked.
astralmemories@iad1-shared-b7-33:~$ composer
   ______
  / ____/___  ____ ___  ____  ____  ________  _____
 / /   / __ \/ __ `__ \/ __ \/ __ \/ ___/ _ \/ ___/
/ /___/ /_/ / / / / / / /_/ / /_/ (__  )  __/ /
\____/\____/_/ /_/ /_/ .___/\____/____/\___/_/
                    /_/
Composer version 2.8.10 2025-07-10 19:08:33
Important Note
Even with Composer installed, most real Drupal operations will still fail on shared hosting due to memory and performance limitations. That’s why this tutorial uses a safer and more reliable approach:
- Run Composer locally
- Deploy the generated files to your server
This avoids all shared hosting restrictions and ensures consistent deployments.
My Drupal Folder Deployer Bash Script
To streamline the Local → DEV → LIVE deployment workflow, I created a simple Bash script that helps you sync key Drupal folders (like vendor, modules, themes, and core) to your shared hosting environments using rsync.
This script makes it easy to:
- Push changes from your local DDEV environment to your DEV site for testing
- Deploy the same changes to your LIVE site when they’re ready
- Run Drush and Git commands remotely (cache clear, config import, git pull, etc.)
It’s intentionally simple and can absolutely be improved—but it’s more than enough to get a smooth deployment workflow running on shared hosting.
Add the folder-deployer.sh Script to Your Drupal Project
Place the script in the root of your Drupal project—right next to the config directory and the web folder.
You can create the file using any editor, including nano:
nano folder-deployer.shPaste the entire script into the file.
#!/bin/bash
# Author: Leonardo Signorelli
# Websites: astralmemories.com, freewebtools.net, codesnippets.freewebtools.net
#
# VENDOR, MODULES, AND SITES FOLDERS DEPLOYER FOR DRUPAL (DreamHost)
#

# Instructions
# ------------
# 1 - Add/Copy this bash script to the root of your Drupal codebase folder (Next to the config, and docroot folders).
# 2 - Add your DreamHost user, domain, and project name to the configuration section below.
# 3 - Make this bash script executable with the following command:
#     chmod +x folder-deployer.sh
# 4 - Execute this script with the following command:
#     ./folder-deployer.sh
# 5 - Follow the instructions on the screen.
# 6 - Deploy!

# -------------
# CONFIGURATION
# -------------
dreamhost_user="astralmemories"     # e.g. yourdreamhostuser
domain="astralmemories.com"         # e.g. yourdomain.com
project_name="drupal"               # e.g. drupal_project (the folder name of your Drupal codebase)

# Domains and paths
dev_domain="${project_name}-dev.${domain}"      # e.g. drupal_project-dev.yourdomain.com
prod_domain="${project_name}.${domain}"         # e.g. drupal_project.yourdomain.com

local_path="/home/${dreamhost_user}/${project_name}"    # e.g. /home/yourdreamhostuser/drupal_project
remote_base="/home/${dreamhost_user}"                   # e.g. /home/yourdreamhostuser

# ------------
# SAFETY CHECK
# ------------
current_path=$(pwd)

if [ "$current_path" != "$local_path" ]; then
    echo "⚠️  Error: This script must be run from:"
    echo "   $local_path"
    echo "But you are running it from:"
    echo "   $current_path"
    echo "Exiting..."
    exit 1
fi

# ----------------------
# DEPLOY VENDOR FUNCTION
# ----------------------
deploy_vendor_to_env () {
    env_name=$1 # dev, prod
    environment_domain=$2 # domain for the environment (e.g. drupal_project-dev.yourdomain.com)
    remote_path="${remote_base}/${environment_domain}"  # e.g. /home/yourdreamhostuser/drupal_project-dev.yourdomain.com

    echo " "
    echo "Starting deployment of the 'vendor' folder to ${env_name^^} (${environment_domain})..."
    echo " "

    confirmation="novalue"
    while true; do

        # Vendor cleanup
        echo " "
        echo -e "Backup current 'vendor' folder? (Yes/No/Cancel = y/n/c)"
        read confirmation
        if [ "$confirmation" == "y" ]; then
ssh "${dreamhost_user}@${domain}" << EOF
cd "${remote_path}"
[ -d "vendor_backup" ] && rm -rf "vendor_backup"
[ -d "vendor" ] && mv "vendor" "vendor_backup"
EOF
        fi
        [ "$confirmation" == "c" ] && break

        # Upload vendor
        echo " "
        echo -e "Upload local 'vendor' folder? (Yes/No/Cancel = y/n/c)"
        read confirmation
        if [ "$confirmation" == "y" ]; then
rsync -avz --delete "${local_path}/vendor/" "${dreamhost_user}@${domain}:${remote_path}/vendor/"
        fi
        [ "$confirmation" == "c" ] && break

        echo " "
        echo "Deployment to ${env_name^^} complete!"
        echo " "
        break
    done

    if [ "$confirmation" == "c" ]; then
        echo " "
        echo "Deployment canceled. Returning to main menu..."
        echo " "
    fi
}

# -----------------------
# DEPLOY MODULES FUNCTION
# -----------------------
deploy_modules_to_env () {
    env_name=$1 # dev, prod
    environment_domain=$2 # domain for the environment (e.g. drupal_project-dev.yourdomain.com)
    remote_path="${remote_base}/${environment_domain}"  # e.g. /home/yourdreamhostuser/drupal_project-dev.yourdomain.com

    echo " "
    echo "Starting deployment of the 'web/modules' folder to ${env_name^^} (${environment_domain})..."
    echo " "

    confirmation="novalue"
    while true; do

        # Modules cleanup
        echo " "
        echo -e "Backup current modules folder? (Yes/No/Cancel = y/n/c)"
        read confirmation
        if [ "$confirmation" == "y" ]; then
ssh "${dreamhost_user}@${domain}" << EOF
cd "${remote_path}/web"
[ -d "modules_backup" ] && rm -rf "modules_backup"
[ -d "modules" ] && mv "modules" "modules_backup"
EOF
        fi
        [ "$confirmation" == "c" ] && break

        # Upload modules
        echo " "
        echo -e "Upload local modules folder? (Yes/No/Cancel = y/n/c)"
        read confirmation
        if [ "$confirmation" == "y" ]; then
rsync -avz --delete "${local_path}/web/modules/" "${dreamhost_user}@${domain}:${remote_path}/web/modules/"
        fi
        [ "$confirmation" == "c" ] && break

        echo " "
        echo "Deployment to ${env_name^^} complete!"
        echo " "
        break
    done

    if [ "$confirmation" == "c" ]; then
        echo " "
        echo "Deployment canceled. Returning to main menu..."
        echo " "
    fi
}

# ----------------------
# DEPLOY THEMES FUNCTION
# ----------------------
deploy_themes_to_env () {
    env_name=$1 # dev, prod
    environment_domain=$2 # domain for the environment (e.g. drupal_project-dev.yourdomain.com)
    remote_path="${remote_base}/${environment_domain}"  # e.g. /home/yourdreamhostuser/drupal_project-dev.yourdomain.com

    echo " "
    echo "Starting deployment of the 'web/themes' folder to ${env_name^^} (${environment_domain})..."
    echo " "

    confirmation="novalue"
    while true; do

        # Themes cleanup
        echo " "
        echo -e "Backup current 'web/themes' folder? (Yes/No/Cancel = y/n/c)"
        read confirmation
        if [ "$confirmation" == "y" ]; then
ssh "${dreamhost_user}@${domain}" << EOF
cd "${remote_path}/web"
[ -d "themes_backup" ] && rm -rf "themes_backup"
[ -d "themes" ] && mv "themes" "themes_backup"
EOF
        fi
        [ "$confirmation" == "c" ] && break

        # Upload themes
        echo " "
        echo -e "Upload local 'web/themes' folder? (Yes/No/Cancel = y/n/c)"
        read confirmation
        if [ "$confirmation" == "y" ]; then
rsync -avz --delete "${local_path}/web/themes/" "${dreamhost_user}@${domain}:${remote_path}/web/themes/"
        fi
        [ "$confirmation" == "c" ] && break

        echo " "
        echo "Deployment to ${env_name^^} complete!"
        echo " "
        break
    done

    if [ "$confirmation" == "c" ]; then
        echo " "
        echo "Deployment canceled. Returning to main menu..."
        echo " "
    fi
}

# ---------------------------
# DEPLOY CORE FOLDER FUNCTION
# ---------------------------
deploy_core_to_env () {
    env_name=$1 # dev, prod
    environment_domain=$2 # domain for the environment (e.g. drupal_project-dev.yourdomain.com)
    remote_path="${remote_base}/${environment_domain}"  # e.g. /home/yourdreamhostuser/drupal_project-dev.yourdomain.com

    echo " "
    echo "Starting deployment of the 'web/core' folder to ${env_name^^} (${environment_domain})..."
    echo " "

    confirmation="novalue"
    while true; do

        # web/core folder cleanup
        echo " "
        echo -e "Backup current 'web/core' folder? (Yes/No/Cancel = y/n/c)"
        read confirmation
        if [ "$confirmation" == "y" ]; then
ssh "${dreamhost_user}@${domain}" << EOF
cd "${remote_path}/web"
[ -d "core_backup" ] && rm -rf "core_backup"
[ -d "core" ] && mv "core" "core_backup"
EOF
        fi
        [ "$confirmation" == "c" ] && break

        # Upload web/core folder
        echo " "
        echo -e "Upload local 'web/core' folder? (Yes/No/Cancel = y/n/c)"
        read confirmation
        if [ "$confirmation" == "y" ]; then
rsync -avz --delete "${local_path}/web/core/" "${dreamhost_user}@${domain}:${remote_path}/web/core/"
        fi
        [ "$confirmation" == "c" ] && break

        echo " "
        echo "Deployment to ${env_name^^} complete!"
        echo " "
        break
    done

    if [ "$confirmation" == "c" ]; then
        echo "Deployment canceled. Returning to main menu..."
    fi
}

# ----------------------------
# DEPLOY SITES FOLDER FUNCTION
# ----------------------------
deploy_sites_to_env () {
    env_name=$1 # dev, prod
    environment_domain=$2 # domain for the environment (e.g. drupal_project-dev.yourdomain.com)
    remote_path="${remote_base}/${environment_domain}"  # e.g. /home/yourdreamhostuser/drupal_project-dev.yourdomain.com

    echo " "
    echo "Starting deployment of the 'web/sites' folder to ${env_name^^} (${environment_domain})..."
    echo " "

    confirmation="novalue"
    while true; do

        # web/sites folder cleanup
        echo " "
        echo -e "Backup current 'web/sites' folder? (Yes/No/Cancel = y/n/c)"
        read confirmation
        if [ "$confirmation" == "y" ]; then
ssh "${dreamhost_user}@${domain}" << EOF
cd "${remote_path}/web"
[ -d "sites_backup" ] && rm -rf "sites_backup"
[ -d "sites" ] && mv "sites" "sites_backup"
EOF
        fi
        [ "$confirmation" == "c" ] && break

        # Upload web/sites folder
        echo " "
        echo -e "Upload local 'web/sites' folder? (Yes/No/Cancel = y/n/c)"
        read confirmation
        if [ "$confirmation" == "y" ]; then
rsync -avz --delete "${local_path}/web/sites/" "${dreamhost_user}@${domain}:${remote_path}/web/sites/"
        fi
        [ "$confirmation" == "c" ] && break

        echo " "
        echo "Deployment to ${env_name^^} complete!"
        echo " "
        break
    done

    if [ "$confirmation" == "c" ]; then
        echo "Deployment canceled. Returning to main menu..."
    fi
}

# -----------------
# GIT PULL FUNCTION
# -----------------
git_pull_in_env () {
    env_name=$1 # dev, prod
    environment_domain=$2 # domain for the environment (e.g. drupal_project-dev.yourdomain.com)
    remote_path="${remote_base}/${environment_domain}"  # e.g. /home/yourdreamhostuser/drupal_project-dev.yourdomain.com

    echo " "
    echo "Starting 'git pull' in ${env_name^^} (${environment_domain})..."
    echo " "

    confirmation="novalue"
    while true; do

        # Git pull
        echo " "
        echo -e "Git pull in remote folder? (Yes/No/Cancel = y/n/c)"
        read confirmation
        if [ "$confirmation" == "y" ]; then
ssh "${dreamhost_user}@${domain}" << EOF
cd "${remote_path}"
git pull
EOF
        fi
        [ "$confirmation" == "c" ] && break

        echo " "
        echo "Git pull in ${env_name^^} complete!"
        echo " "
        break
    done

    if [ "$confirmation" == "c" ]; then
        echo " "
        echo "Git pull canceled. Returning to main menu..."
        echo " "
    fi
}

# ----------------------
# IMPORT CONFIG FUNCTION
# ----------------------
import_config_in_env () {
    env_name=$1 # dev, prod
    environment_domain=$2 # domain for the environment (e.g. drupal_project-dev.yourdomain.com)
    remote_path="${remote_base}/${environment_domain}"  # e.g. /home/yourdreamhostuser/drupal_project-dev.yourdomain.com

    echo " "
    echo "Starting config import in ${env_name^^} (${environment_domain})..."
    echo " "

    confirmation="novalue"
    while true; do

        # Import config
        echo " "
        echo -e "Import Drupal config? (Yes/No/Cancel = y/n/c)"
        read confirmation
        if [ "$confirmation" == "y" ]; then
ssh "${dreamhost_user}@${domain}" << EOF
cd "${remote_path}"
drush cim -y
EOF
        fi
        [ "$confirmation" == "c" ] && break

        echo " "
        echo "Config import in ${env_name^^} complete!"
        echo " "
        break
    done

    if [ "$confirmation" == "c" ]; then
        echo " "
        echo "Config import canceled. Returning to main menu..."
        echo " "
    fi
}

# --------------------
# CLEAR CACHE FUNCTION
# --------------------
clear_cache_in_env () {
    env_name=$1 # dev, prod
    environment_domain=$2 # domain for the environment (e.g. drupal_project-dev.yourdomain.com)
    remote_path="${remote_base}/${environment_domain}"  # e.g. /home/yourdreamhostuser/drupal_project-dev.yourdomain.com

    echo " "
    echo "Starting cache clear in ${env_name^^} (${environment_domain})..."
    echo " "

    confirmation="novalue"
    while true; do

        # Clear cache
        echo " "
        echo -e "Clear Drupal cache? (Yes/No/Cancel = y/n/c)"
        read confirmation
        if [ "$confirmation" == "y" ]; then
ssh "${dreamhost_user}@${domain}" << EOF
cd "${remote_path}"
drush cr
EOF
        fi
        [ "$confirmation" == "c" ] && break

        echo " "
        echo "Cache clear in ${env_name^^} complete!"
        echo " "
        break
    done

    if [ "$confirmation" == "c" ]; then
        echo " "
        echo "Cache clear canceled. Returning to main menu..."
        echo " "
    fi
}

# -------------
# SPLASH SCREEN
# -------------
echo "    ┏━━━━━━━━━━━━━━━━━━━━━━━━━━━━━━━━━━━━━━━━┓   "
echo "    ┃ ╺┳┓┏━┓╻ ╻┏━┓┏━┓╻    ┏━╸┏━┓╻  ╺┳┓┏━╸┏━┓ ┃   "
echo "    ┃  ┃┃┣┳┛┃ ┃┣━┛┣━┫┃    ┣╸ ┃ ┃┃   ┃┃┣╸ ┣┳┛ ┃   "
echo "    ┃ ╺┻┛╹┗╸┗━┛╹  ╹ ╹┗━╸  ╹  ┗━┛┗━╸╺┻┛┗━╸╹┗╸ ┃   "
echo "    ┃       ╺┳┓┏━╸┏━┓╻  ┏━┓╻ ╻┏━╸┏━┓         ┃   "
echo "    ┃        ┃┃┣╸ ┣━┛┃  ┃ ┃┗┳┛┣╸ ┣┳┛         ┃   "
echo "    ┃       ╺┻┛┗━╸╹  ┗━╸┗━┛ ╹ ┗━╸╹┗╸         ┃   "
echo "    ┗━━━━━━━━━━━━━━━━━━━━━━━━━━━━━━━━━━━━━━━━┛   "

# --------------------------------
# ENVIRONMENT SELECTOR & MAIN MENU
# --------------------------------

env_name="dev"
env_domain="$dev_domain"

while true; do
    # Environment selection menu
    echo "                  /'''''''''''\                 "
    echo "               ~o| ENVIRONMENT |o~              "
    echo "                  \.........../                 "
    echo "o-----------------------------------------------o"
    echo "|   1 - DEV (Development)                       |"
    echo "|   2 - PROD (Production)                       |"
    echo "o-----------------------------------------------o"
    echo "|   Q - Exit                                    |"
    echo "o-----------------------------------------------o"
    echo " "
    echo -n "Select environment: "
    read env_selection
    echo " "

    case "$env_selection" in
        1)
            env_name="dev"
            env_domain="$dev_domain"
            ;;
        2)
            env_name="prod"
            env_domain="$prod_domain"
            ;;
        Q|q)
            echo "Exiting..."
            exit 0
            ;;
        *)
            echo "Invalid selection. Please try again."
            continue
            ;;
    esac

    # Main menu for selected environment
    while true; do
        # Pad environment label for menu alignment
        if [ "$env_name" = "dev" ]; then
            env_label="DEV "
        else
            env_label="PROD"
        fi

        echo "                   /'''''''''\                   "
        echo "                ~o| MAIN MENU |o~                "
        echo "                   \........./                   "
        echo "o-------------- Environment: ${env_label} --------------o"
        echo "|   1 - Deploy 'vendor' folder to ${env_label}          |"
        echo "|   2 - Deploy 'web/modules' folder to ${env_label}     |"
        echo "|   3 - Deploy 'web/themes' folder to ${env_label}      |"
        echo "|   4 - Deploy 'web/core' folder to ${env_label}        |"
        echo "|   5 - Deploy 'web/sites' folder to ${env_label}       |"
        echo "|   6 - Git pull in ${env_label}                        |"
        echo "|   7 - Import config in ${env_label}                   |"
        echo "|   8 - Clear cache in ${env_label}                     |"
        echo "|   9 - Select Environment (DEV/PROD)           |"
        echo "o-----------------------------------------------o"
        echo "|   Q - Exit                                    |"
        echo "o-----------------------------------------------o"
        echo " "
        echo -n "Select a number from the Main Menu: "
        read selection
        echo " "

        case "$selection" in
            1)
                deploy_vendor_to_env "$env_name" "$env_domain"
                ;;
            2)
                deploy_modules_to_env "$env_name" "$env_domain"
                ;;
            3)
                deploy_themes_to_env "$env_name" "$env_domain"
                ;;
            4)
                deploy_core_to_env "$env_name" "$env_domain"
                ;;
            5)
                deploy_sites_to_env "$env_name" "$env_domain"
                ;;
            6)
                git_pull_in_env "$env_name" "$env_domain"
                ;;
            7)
                import_config_in_env "$env_name" "$env_domain"
                ;;
            8)
                clear_cache_in_env "$env_name" "$env_domain"
                ;;
            9)
                break # Go back to environment selector
                ;;
            Q|q)
                echo "Exiting..."
                exit 0
                ;;
            *)
                echo "Invalid selection. Please try again."
                ;;
        esac
    done
done
Configure the Script for Your Project
Inside the script, update the configuration section so it matches:
- your DreamHost/Shared Hosting SSH username
- your domain name
- your project folder name
Configuration section:
# -------------
# CONFIGURATION
# -------------
dreamhost_user="yourdreamhostuser"  # Your hosting username
domain="astralmemories.com"         # Your domain (e.g. yourdomain.com)
project_name="drupal"               # Folder name of your Drupal project (e.g. drupal_project)

# Domains and paths
dev_domain="${project_name}-dev.${domain}"      # e.g. drupal_project-dev.yourdomain.com
prod_domain="${project_name}.${domain}"         # e.g. drupal_project.yourdomain.com

local_path="/home/${dreamhost_user}/${project_name}"    # e.g. /home/yourdreamhostuser/drupal_project
remote_base="/home/${dreamhost_user}"                   # e.g. /home/yourdreamhostuser
Make sure project_name matches the name of the folder on your local machine, not the one on the server.
Understanding the Safety Check
The script includes a simple safety check that prevents accidental execution from the wrong directory:
# ------------
# SAFETY CHECK
# ------------
current_path=$(pwd)

if [ "$current_path" != "$local_path" ]; then
    echo "⚠️  Error: This script must be run from:"
    echo "   $local_path"
    echo "But you are running it from:"
    echo "   $current_path"
    echo "Exiting..."
    exit 1
fi
This ensures the script only runs when executed from your correct local Drupal environment path.
Adjust local_path so it matches your actual machine:
local_path="/home/localusername/${project_name}"
# e.g. /home/yourlocalusername/drupal_project
Make the Script Executable
Before you can run the script, make it executable:
chmod +x folder-deployer.shRun the Script
Execute it with:
./folder-deployer.shYou’ll immediately see the splash screen and the environment selector:
    ┏━━━━━━━━━━━━━━━━━━━━━━━━━━━━━━━━━━━━━━━━┓
    ┃ ╺┳┓┏━┓╻ ╻┏━┓┏━┓╻    ┏━╸┏━┓╻  ╺┳┓┏━╸┏━┓ ┃
    ┃  ┃┃┣┳┛┃ ┃┣━┛┣━┫┃    ┣╸ ┃ ┃┃   ┃┃┣╸ ┣┳┛ ┃
    ┃ ╺┻┛╹┗╸┗━┛╹  ╹ ╹┗━╸  ╹  ┗━┛┗━╸╺┻┛┗━╸╹┗╸ ┃
    ┃       ╺┳┓┏━╸┏━┓╻  ┏━┓╻ ╻┏━╸┏━┓         ┃
    ┃        ┃┃┣╸ ┣━┛┃  ┃ ┃┗┳┛┣╸ ┣┳┛         ┃
    ┃       ╺┻┛┗━╸╹  ┗━╸┗━┛ ╹ ┗━╸╹┗╸         ┃
    ┗━━━━━━━━━━━━━━━━━━━━━━━━━━━━━━━━━━━━━━━━┛
                  /'''''''''''\
               ~o| ENVIRONMENT |o~
                  \.........../
o-----------------------------------------------o
|   1 - DEV (Development)                       |
|   2 - PROD (Production)                       |
o-----------------------------------------------o
|   Q - Exit                                    |
o-----------------------------------------------o

Select environment:
Just type 1 for DEV or 2 for PROD and press Enter to continue.
To exit the script, type q, in the main menu, and press Enter.
At this point, we won’t deploy anything yet—you still need to complete a few more configuration steps before using the script in practice.
Configure the Database connection in your Drupal settings.php for your DEV and Live sites
Right now, only your local Drupal site is connected to a database—this is handled automatically by DDEV. If you open:
web/sites/default/settings.phpYou’ll see this block at the very end:
// Automatically generated include for settings managed by ddev.
if (getenv('IS_DDEV_PROJECT') == 'true' && file_exists(__DIR__ . '/settings.ddev.php')) {
  include __DIR__ . '/settings.ddev.php';
}
This tells Drupal to load the local DDEV database configuration. We won’t touch or modify this block—it’s required for your local site to work.
Now let’s prepare the same file to support your DEV and LIVE sites on shared hosting.
Move the Configuration Sync Directory
By default, Drupal saves exported configuration inside:
sites/default/files/config_HASH/This location is:
- inside the web-accessible directory
- inside a hashed folder that is not very convenient to find or manage
- not ideal for version control
Best practice is to move your sync directory outside of the public webroot, ideally to a location you can easily commit to Git.
For this workflow, we’ll use:
drupal_root/config/syncAdd this line before the DDEV include block in settings.php:
// Set the location of the directory used for syncing configuration data.
$settings['config_sync_directory'] = '../config/sync';
This ensures:
- exported config is cleanly stored
- version control remains simple
- you can reuse the same settings.php in all environments (local, dev, live)
Use Environment Variables for Database Credentials
Instead of hard-coding database credentials in settings.php, we will use environment variables. This is the modern and recommended Drupal practice.
Environment variables allow you to safely store secrets like:
- database name
- database user
- database password
- database host
- hash salt
Where will these variables be stored?
On DreamHost shared hosting, the easiest place to define environment variables is inside an .htaccess file in the root folder of each site (DEV and LIVE). We will create those .htaccess files later.
Example .htaccess content:
SetEnv DB_NAME yourDBname
SetEnv DB_USER yourDBuser
SetEnv DB_PASS yourDBpassword
SetEnv DB_HOST yourDBhost
(You’ll add HASH_SALT later too.)
Add Database Settings to settings.php
In your local settings.php, add the following block before:
- the DDEV include block
- the config sync directory line
$databases['default']['default'] = [
    'database' => getenv('DB_NAME'),
    'username' => getenv('DB_USER'),
    'password' => getenv('DB_PASS'),
    'prefix' => '',
    'host' => getenv('DB_HOST'),
    'port' => '3306',
    'isolation_level' => 'READ COMMITTED',
    'namespace' => 'Drupal\\mysql\\Driver\\Database\\mysql',
    'driver' => 'mysql',
    'autoload' => 'core/modules/mysql/src/Driver/Database/mysql/',
  ];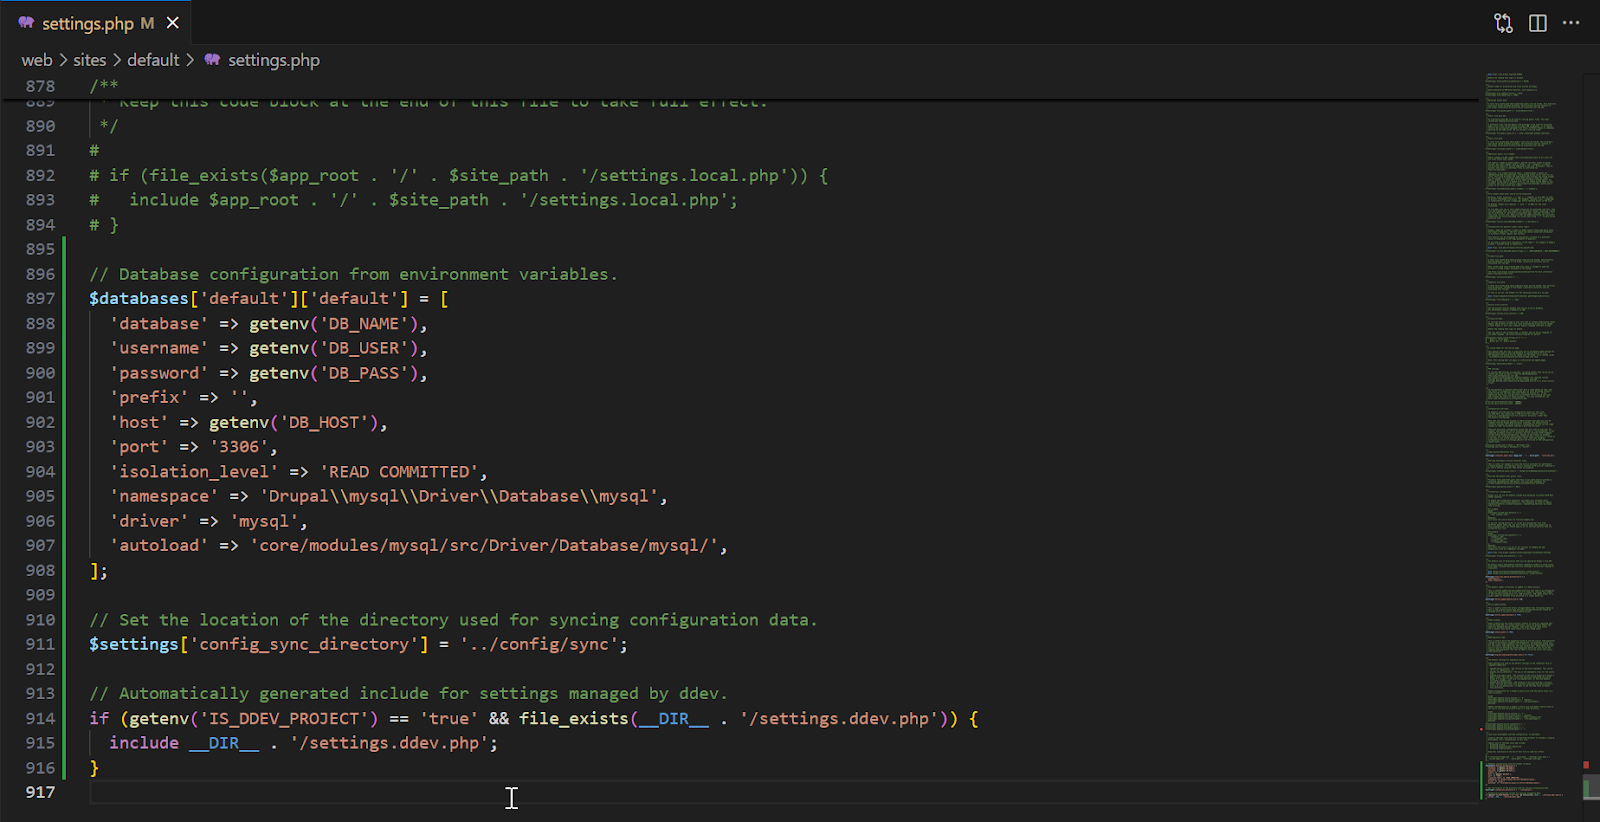
This tells Drupal to read all credentials from environment variables.
Your DEV and LIVE sites will automatically connect to their correct database once you create the .htaccess files.
Generate a Unique $settings[‘hash_salt’] for Each Environment
Drupal’s hash_salt is critical for security. It’s used for:
- CSRF tokens
- session keys
- private file URLs
- cache keys
- one-time login links
Every environment must have its own unique hash salt. Sharing the same salt between environments is a security risk.
Find (or add) this in settings.php:
$settings['hash_salt'] = '';Replace it with:
$settings['hash_salt'] = getenv('HASH_SALT');Just like the database credentials, the actual salt value will be stored in your site’s .htaccess file as an environment variable. We will create those .htaccess files in a later step.
This section is now complete—your settings.php is ready to support Local, DEV, and LIVE using clean environment-based configuration.
Create a Database Dump of Your Local Drupal Website
To set up your DEV and LIVE sites on your shared hosting account, we’ll first export a copy of your local Drupal database. This exported file can then be imported into both environments so they start with the exact same data, configuration, users, and content as your local site.
We’ll use Drush (inside DDEV) to create this database dump.
Export the Drupal Database Using Drush
From the root folder of your local DDEV project, run the following command:
ddev drush sql:dump --extra-dump=--no-tablespaces --result-file=../drupaldb_2025-11-07.sqlThis will create a database export named:
drupaldb_2025-11-07.sqlsaved one directory above your Drupal project web/ folder.
You can change the filename to any name/date format you prefer.
What Each Part of the Command Does
drush sql:dumpThis tells Drush to export the entire Drupal database—similar to using mysqldump, but wrapped inside a convenient Drush command.
--extra-dump=--no-tablespacesThis flag is important. It passes the –no-tablespaces option to the mysqldump process that Drush uses internally.
–no-tablespaces helps avoid issues when importing the database on different servers (like shared hosting), because:
- It removes TABLESPACE and DATA DIRECTORY instructions
- These instructions often reference directory paths that only exist on the original server
- Without this option, imports can fail with “tablespace” or “no such file or directory” errors
In short: this flag makes your SQL dump more portable and compatible across environments.
Now you have a clean database dump that we’ll later import into your DEV and LIVE sites.
Commit and Push Your Changes to Your Repository
Now that you’ve created and configured the deployer script, updated your settings.php file and generated your database dump, it’s time to commit everything to your Git repository.
From the root folder of your DDEV project, run:
git statusYou should see something like:
- web/sites/default/settings.php marked as modified
- Your database dump (e.g., drupaldb_2025-11-07.sql) listed as untracked
- Your deployment script (e.g., folder-deployer.sh) also untracked
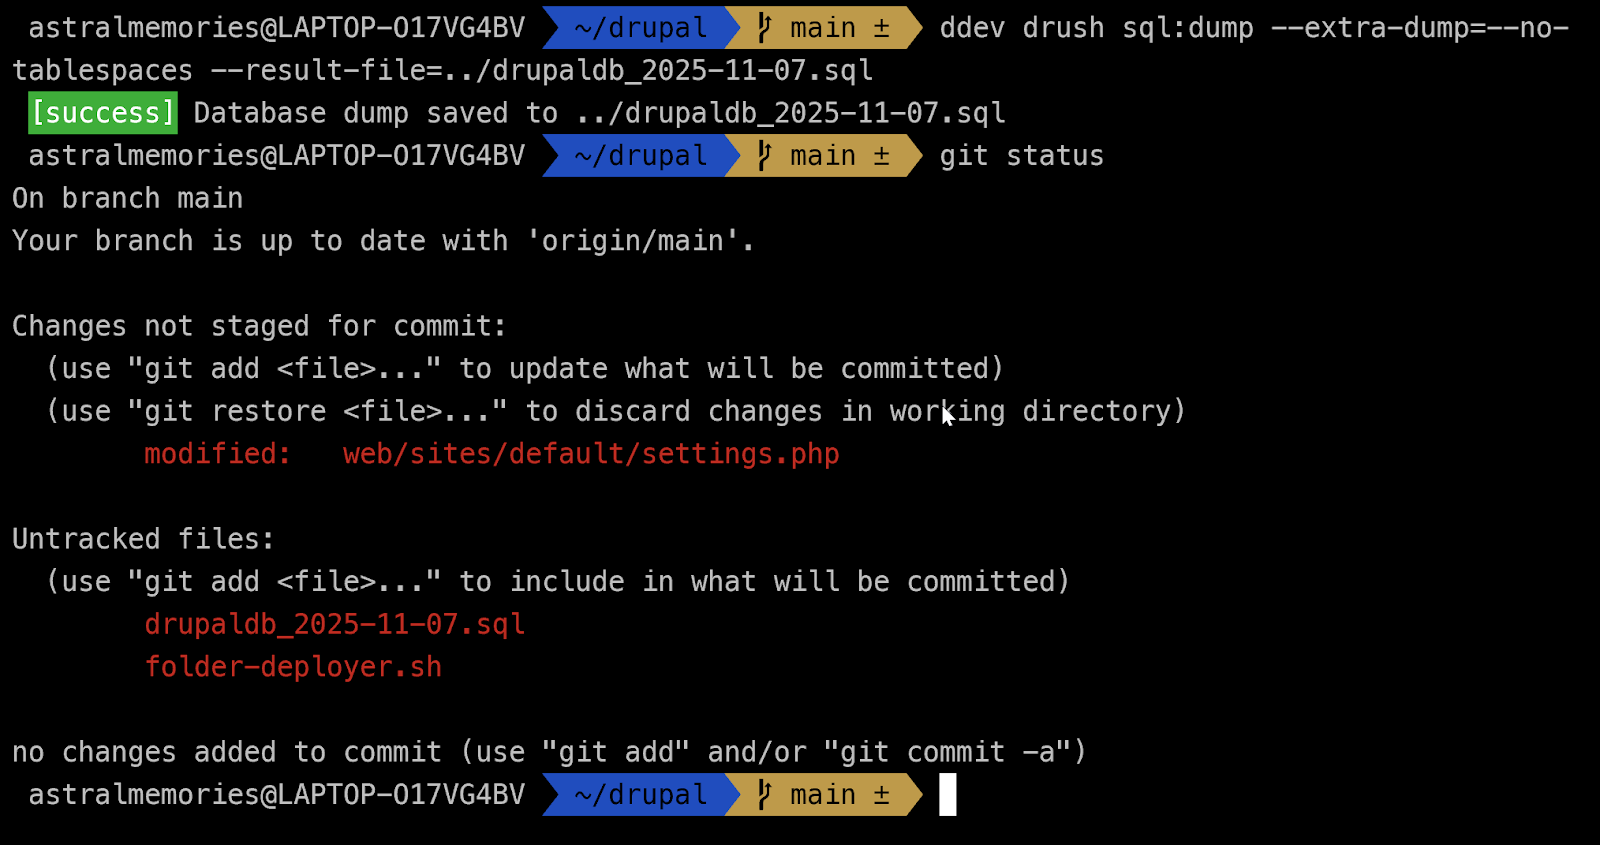
1. Add the files to the staging area
git add web/sites/default/settings.php
git add drupaldb_2025-11-07.sql
git add folder-deployer.sh
2. Commit the changes
git commit -m "Database connection in settings.php, Local database dump, and Deployer script."3. Push everything to your remote repository
git push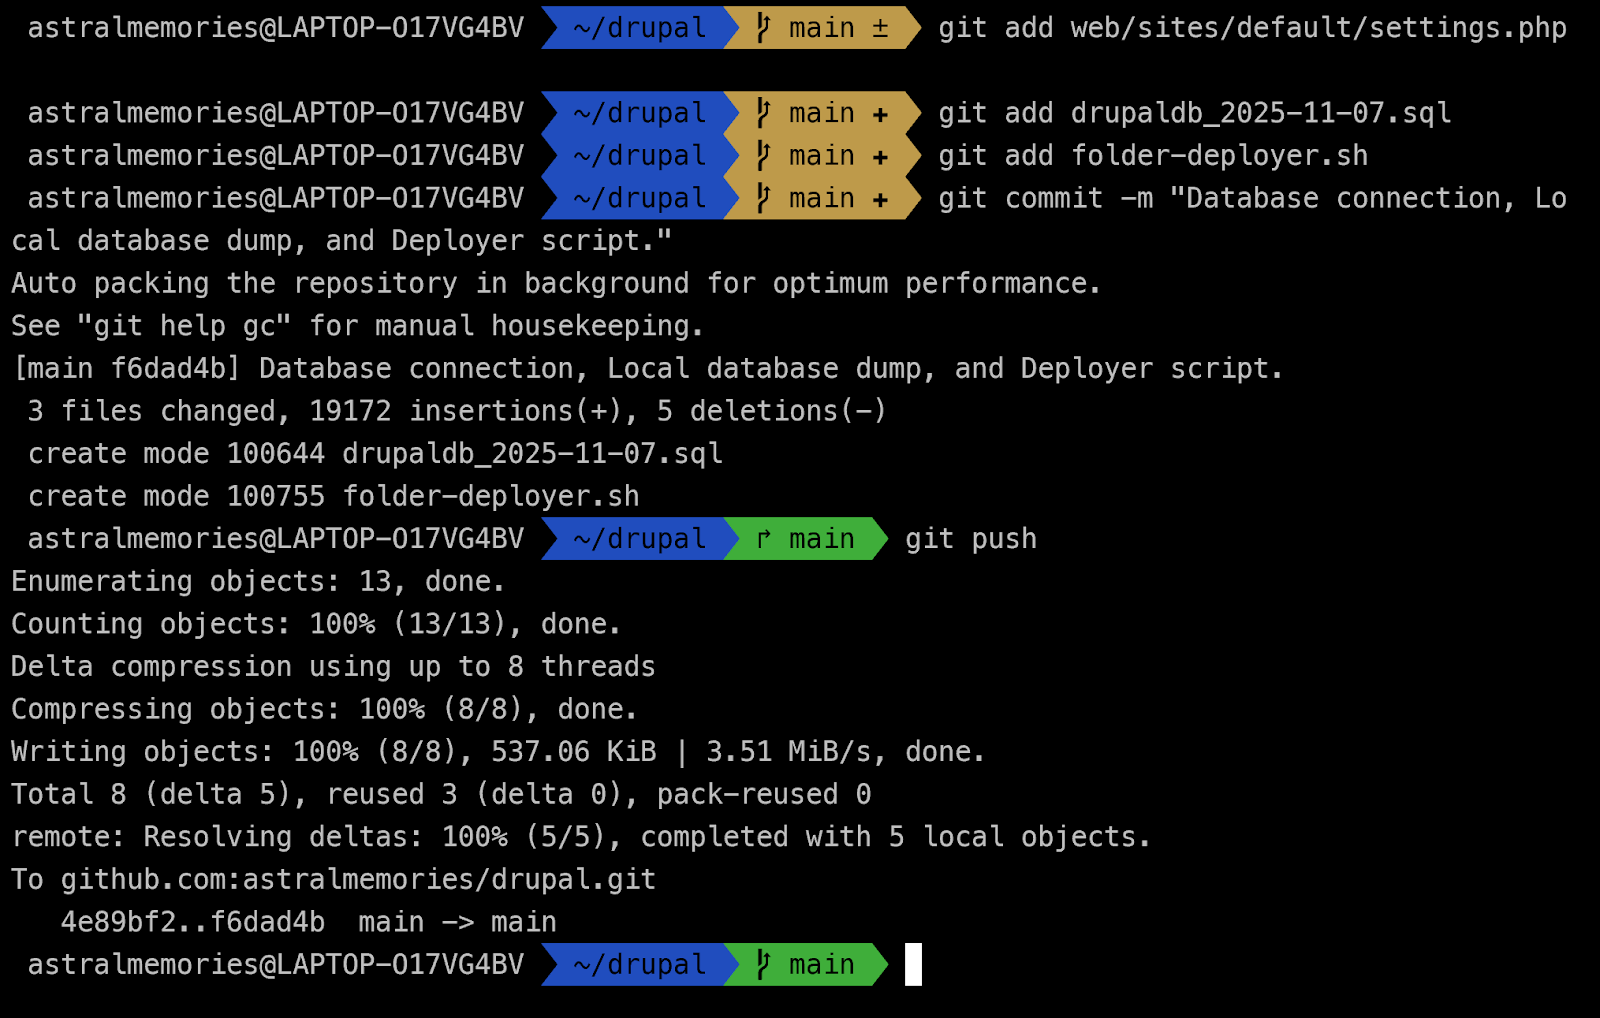
Your repository will now include:
- The updated database configuration logic
- Your local site’s SQL dump
- Your deployment script
These will be used later when setting up your DEV and LIVE environments.
Finish Setting Up Your DEV and LIVE Websites
Now that your code is in your Git repository, it’s time to finish preparing your DEV and LIVE environments inside your Shared Hosting account.
In this step, you will:
- Clone your repository into each site folder
- Create .htaccess files containing environment variables
- Assign each site its own HASH_SALT
- Configure Drush to work correctly on shared hosting
- Configure automatic loading of environment variables for CLI (Drush, PHP, etc.)
By the end, both your DEV and LIVE environments will understand:
- How to connect to their correct databases
- How to load their own hash salts
- How to run Drush independently
1. Connect to Your Shared Hosting via SSH
On your local machine, open a terminal and log into your hosting account:
ssh useraccount@yourdomain.comNavigate to your home directory (where DreamHost places your website folders):
cd ~You should see both site folders:
drupal-dev.astralmemories.com/
drupal.astralmemories.com/
2. Clone Your Repository Into the DEV Website Folder
First, remove the existing DEV folder (DreamHost creates a placeholder folder when you create the domain).
rm -rf drupal-dev.astralmemories.com/Now clone your repository into a fresh folder:
git clone git@github.com:astralmemories/drupal.git drupal-dev.astralmemories.com3. Create the DEV .htaccess With Environment Variables
Open the .htaccess file inside your new DEV project directory:
nano drupal-dev.astralmemories.com/.htaccessPaste the following template:
SetEnv DB_NAME yourDevDBname
SetEnv DB_USER yourDevDBuser
SetEnv DB_PASS yourDevDBpassword
SetEnv DB_HOST yourDevDBhost
SetEnv HASH_SALT yourDevDrupalHashSalt
Replace each placeholder with the real values for your DEV database.
Generate a Secure Hash Salt for the DEV Environment
Each site (Local, DEV, LIVE) needs its own HASH_SALT.
Use either Drush or PHP inside your local DDEV environment.
Using Drush
ddev drush php-eval "echo \Drupal\Component\Utility\Crypt::randomBytesBase64(55) . PHP_EOL;"Using PHP
ddev php -r 'echo base64_encode(random_bytes(55)), "\n";'Copy the generated string and replace the HASH_SALT placeholder in your .htaccess file, for example:
SetEnv HASH_SALT Jrq9em2vEE2d1/i9XYNLUud56yJ1FzLe6dTzOum85LMLFSRrNG//EP55nSby0piS7sMrH0pb4Q=Save and exit nano (CTRL + X, then press Y).
4. Clone Your Repository Into the LIVE Website Folder
Remove the existing LIVE site folder:
rm -rf drupal.astralmemories.com/Clone the repo:
git clone git@github.com:astralmemories/drupal.git drupal.astralmemories.com5. Create the LIVE .htaccess With Environment Variables
Open the .htaccess file:
nano drupal.astralmemories.com/.htaccessPaste the LIVE template:
SetEnv DB_NAME yourLiveDBname
SetEnv DB_USER yourLiveDBuser
SetEnv DB_PASS yourLiveDBpassword
SetEnv DB_HOST yourLiveDBhost
SetEnv HASH_SALT yourLiveDrupalHashSalt
Just like before:
- Replace database values
- Generate a different HASH_SALT for production
- Paste the new secure salt into the file
Save and exit nano.
6. Configure Drush to Work on Shared Hosting
At this point, your DEV and LIVE folders contain your Drupal code — but Drush won’t work yet because:
- No vendor folder has been deployed yet
- Drush doesn’t know where its binary lives
- The CLI does not automatically load .htaccess environment variables
We’ll fix all of that now.
Auto-Detect Drush in Each Site Folder
We will use the .bash_profile file which is a configuration file in a user’s home directory that runs commands for an interactive login shell. Changes made in .bash_profile take effect after you log out and log back in, or you can run source ~/.bash_profile to apply them immediately.
Edit your ~/.bash_profile:
cd ~
nano .bash_profile
Add this function:
# Auto-Detect Local Drush
function drush() {
  if [ -f ./vendor/bin/drush ]; then
    ./vendor/bin/drush "$@"
  else
    echo "⚠ Drush not found in current directory's vendor/bin. Please run from a valid Drupal project."
  fi
}
Save and exit nano (CTRL + X, then press Y).
This ensures Drush automatically uses the correct binary located in each site’s vendor/bin/ directory.
Apply the update:
source ~/.bash_profileMake Environment Variables Available to Drush (CLI)
Here’s the problem:
- Your .htaccess defines environment variables
- But .htaccess is only read by Apache
- Drush runs via CLI → it never sees those variables
To fix this, we will automatically load the environment variables from the corresponding .htaccess file whenever you enter a Drupal site folder.
Re-open your .bash_profile:
nano ~/.bash_profileAdd this block at the bottom:
# ========================================================
# Drupal Environment Variable Loader for CLI (Drush, etc.)
# ========================================================

# Function to load SetEnv values from an .htaccess file
load_htaccess_env() {
  local htaccess_file="$1"
  if [[ -f "$htaccess_file" ]]; then
    # Read lines starting with SetEnv, extract key/value, and export
    while read -r line; do
      if [[ "$line" =~ ^SetEnv[[:space:]]+([A-Za-z0-9_]+)[[:space:]]+(.+) ]]; then
        export "${BASH_REMATCH[1]}"="${BASH_REMATCH[2]}"
      fi
    done < "$htaccess_file"
  fi
}

# Detect which site folder you're currently in and load its .htaccess
current_dir=$(pwd)

if [[ "$current_dir" == *"drupal-dev.astralmemories.com"* ]]; then
  echo "Loading DEV environment variables..."
  load_htaccess_env "$HOME/drupal-dev.astralmemories.com/.htaccess"
elif [[ "$current_dir" == *"drupal.astralmemories.com"* ]]; then
  echo "Loading PROD environment variables..."
  load_htaccess_env "$HOME/drupal.astralmemories.com/.htaccess"
fi

# Auto-load .htaccess env when entering Drupal directories
cd() {
  builtin cd "$@" || return
  if [[ "$PWD" == *"drupal-dev.astralmemories.com"* ]] || [[ "$PWD" == *"drupal.astralmemories.com"* ]]; then
    source ~/.bash_profile >/dev/null 2>&1
  fi
}
Replace folder names with your own if different.
Save and exit nano, then apply the changes:
source ~/.bash_profileHow This Helps
✔ Drush now automatically points to each site’s local vendor/bin/drush
✔ Database credentials load automatically when you cd into a Drupal site
✔ The correct HASH_SALT loads per environment
✔ Your deploy script will be able to run:
- drush cr
- drush cim
- other Drush commands
Your DEV and LIVE sites are now fully prepared for deployment.
Deploy the Missing Drupal Folders to Your DEV Website
With your DEV environment cloned from Git and fully configured, the next step is to deploy the missing folders (vendor, web/modules, web/core, and web/sites) from your local DDEV environment to your DEV site on shared hosting.
This is exactly what your folder-deployer.sh script is designed to do.
1. Run the Deployer Script From Your Local DDEV Environment
Navigate to the root of your Local Drupal project (inside DDEV) and run:
./folder-deployer.shYou’ll see the ASCII splash screen and the environment selector:
    ┏━━━━━━━━━━━━━━━━━━━━━━━━━━━━━━━━━━━━━━━━┓
    ┃ ╺┳┓┏━┓╻ ╻┏━┓┏━┓╻    ┏━╸┏━┓╻  ╺┳┓┏━╸┏━┓ ┃
    ┃  ┃┃┣┳┛┃ ┃┣━┛┣━┫┃    ┣╸ ┃ ┃┃   ┃┃┣╸ ┣┳┛ ┃
    ┃ ╺┻┛╹┗╸┗━┛╹  ╹ ╹┗━╸  ╹  ┗━┛┗━╸╺┻┛┗━╸╹┗╸ ┃
    ┃       ╺┳┓┏━╸┏━┓╻  ┏━┓╻ ╻┏━╸┏━┓         ┃
    ┃        ┃┃┣╸ ┣━┛┃  ┃ ┃┗┳┛┣╸ ┣┳┛         ┃
    ┃       ╺┻┛┗━╸╹  ┗━╸┗━┛ ╹ ┗━╸╹┗╸         ┃
    ┗━━━━━━━━━━━━━━━━━━━━━━━━━━━━━━━━━━━━━━━━┛
                  /'''''''''''\
               ~o| ENVIRONMENT |o~
                  \.........../
o-----------------------------------------------o
|   1 - DEV (Development)                       |
|   2 - PROD (Production)                       |
o-----------------------------------------------o
|   Q - Exit                                    |
o-----------------------------------------------o
Select environment: 1
Type 1 and press Enter to select the DEV environment.
This opens the main deployment menu:
                  /'''''''''\
               ~o| MAIN MENU |o~
                  \........./
o-------------- Environment: DEV  --------------o
|   1 - Deploy 'vendor' folder to DEV           |
|   2 - Deploy 'web/modules' folder to DEV      |
|   3 - Deploy 'web/themes' folder to DEV       |
|   4 - Deploy 'web/core' folder to DEV         |
|   5 - Deploy 'web/sites' folder to DEV        |
|   6 - Git pull in DEV                         |
|   7 - Import config in DEV                    |
|   8 - Clear cache in DEV                      |
|   9 - Select Environment (DEV/PROD)           |
o-----------------------------------------------o
|   Q - Exit                                    |
o-----------------------------------------------o

Select a number from the Main Menu:
2. Deploy the vendor Folder to the DEV Website
Choose option 1, Deploy ‘vendor’ folder to DEV:
The script asks if you want to back up the current vendor folder on the server.
Since this is your first deployment, select No:
Backup current 'vendor' folder? (Yes/No/Cancel = y/n/c)
n
Then it asks if you want to upload your local vendor folder, select Yes:
Upload local 'vendor' folder? (Yes/No/Cancel = y/n/c)
Y
You’ll be prompted to enter your shared hosting password so the script can sync via SSH/rsync:
(youraccount@yourhostingdomain.com) Password:Once the deployment finishes, the script returns you to the main menu.
3. Deploy the web/modules Folder to DEV
Now deploy your modules (core, contributed, and custom). Type 2 and press Enter to select “Deploy ‘web/modules’ folder to DEV”:
Select a number from the Main Menu: 2

Starting deployment of the 'web/modules' folder to DEV (drupal-dev.astralmemories.com)...
Again, skip the backup:
Backup current modules folder? (Yes/No/Cancel = y/n/c)
n
Upload the local folder, select Yes:
Upload local modules folder? (Yes/No/Cancel = y/n/c)
Y
Enter your password when prompted.
Once the process is done, you will go back to the Deployer script main menu.
4. Deploy the web/core Folder to DEV
We still need to deploy the ‘web/core’ folder to the DEV website. Type 4 and press Enter to select “Deploy ‘web/core’ folder to DEV”:
Select a number from the Main Menu: 4

Starting deployment of the 'web/core' folder to DEV (drupal-dev.astralmemories.com)...
Skip the backup:
Backup current 'web/core' folder? (Yes/No/Cancel = y/n/c)
n
Upload your local ‘web/core’ folder, select Yes:
Upload local 'web/core' folder? (Yes/No/Cancel = y/n/c)
y
Enter your password again.
Verify Drush Connectivity on the DEV Website
At this point, you should be able to run “drush status” against your DEV website.
Connect via SSH to your hosting account, go to your DEV site folder:
cd ~/drupal-dev.yourdomain.com/Run:
drush statusYou should see output similar to:
your-user-account@iad1-shared-b7-33:~/drupal-dev.yourdomain.com$ drush status
Drupal version : 11.2.5
Site URI       : http://default
DB driver      : mysql
DB hostname    : yourDevDBhost
DB port        : 3306
DB username    : yourDevDBuser
DB name        : yourDevDBname
PHP binary     : /usr/local/php83/bin/php
PHP config     : /etc/php83/php.ini
PHP OS         : Linux
PHP version    : 8.3.14
Drush script   : /home/your-user-account/drupal-dev.yourdomain.com/vendor/bin/drush.php
Drush version  : 13.6.2.0
Drush temp     : /tmp
Drush configs  : /home/your-user-account/drupal-dev.yourdomain.com/vendor/drush/drush/dru
                sh.yml
Drupal root    : /home/your-user-account/drupal-dev.yourdomain.com/web
Site path      : sites/default
Drupal config  : ../config/sync
your-user-account@iad1-shared-b7-33:~/drupal-dev.yourdomain.com$
This confirms:
✔ Drush is working
✔ Environment variables are loading
✔ Database credentials are detected correctly
5. Deploy the web/sites Folder to DEV (Assets, Files, Images)
Finally, deploy the web/sites folder, which contains:
- Files uploaded by Drupal
- Image styles
- Any public/private files
Type 5 and press Enter to select “Deploy ‘web/sites’ folder to DEV”:
Select a number from the Main Menu: 5

Starting deployment of the 'web/sites' folder to DEV (drupal-dev.astralmemories.com)...
Skip the backup:
Backup current 'web/sites' folder? (Yes/No/Cancel = y/n/c)
n
Upload your local ‘web/sites’ folder, select Yes:
Upload local 'web/sites' folder? (Yes/No/Cancel = y/n/c)
y
Enter your hosting password when prompted.
When finished, you will go back to the Deployer script main menu.
Type q and press Enter to exit the script:
Select a number from the Main Menu: q
Exiting...
Your DEV website now contains:
✔ Full Drupal core
✔ All contrib + custom modules
✔ All site assets
✔ A complete vendor folder
The only thing missing is the database.
6. Import the Local Database Into Your DEV Website
Now that all files are deployed, you’re ready to import your Local DDEV database dump into your DEV site.
Still inside your DEV folder via SSH:
drush sql:cli < drupaldb_2025-11-07.sqlReplace the filename with your actual database dump.
When the import finishes, clear the Drupal cache:
drush crYou should see:
drush cr
[success] Cache rebuild complete.
7. Visit the DEV Website
Now open your DEV site in the browser: https://drupal-dev.yourdomain.com
You should now see a fully functional clone of your Local Drupal site:
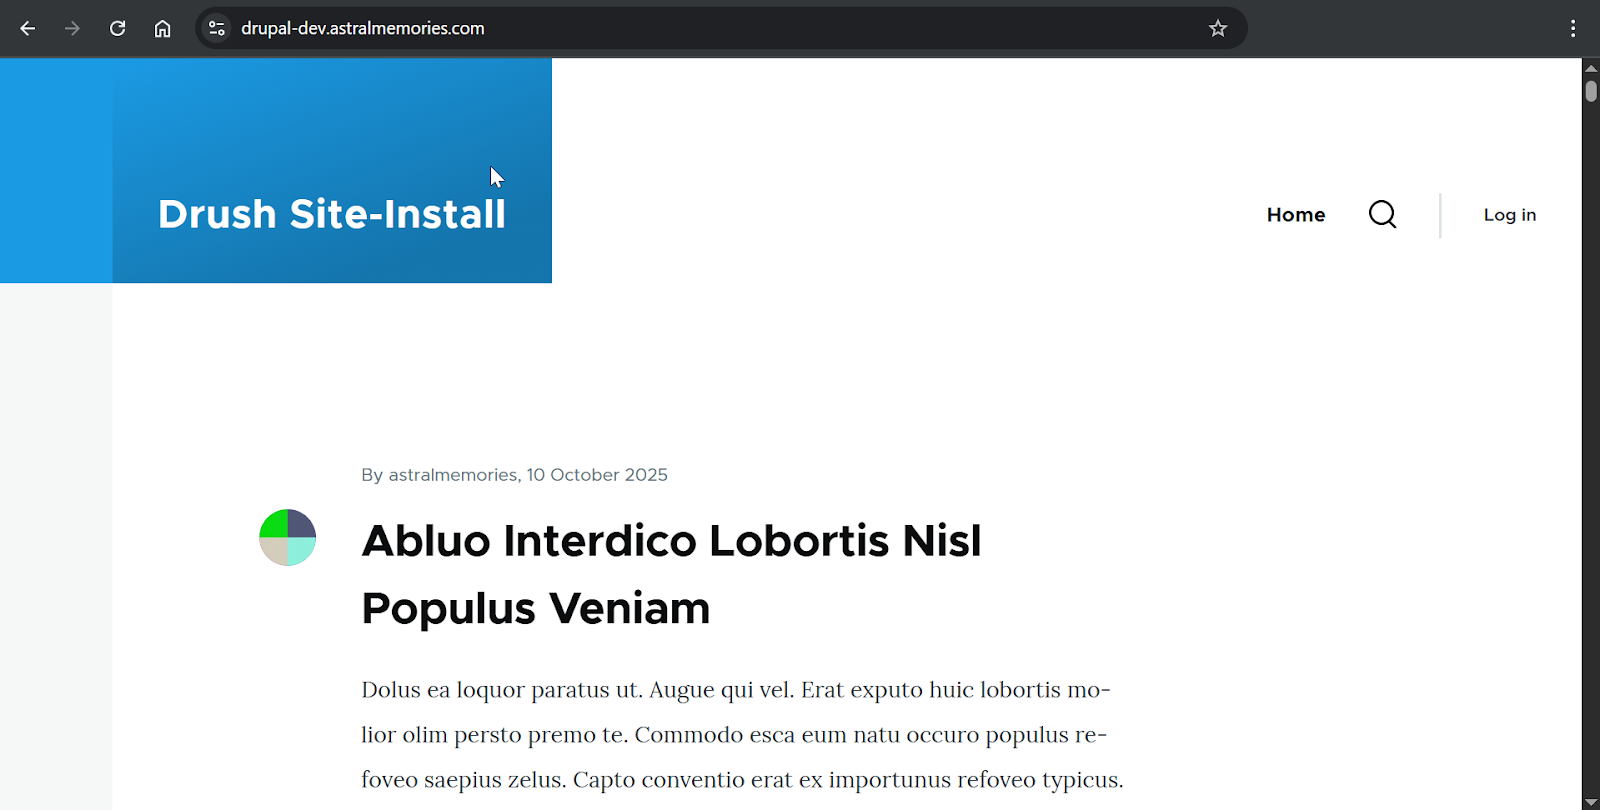
At this point, the DEV website is fully configured, and the entire workflow is validated.
Deploy the Missing Drupal Folders to Your Live Website (PROD)
Now that your DEV environment is fully deployed and functional, the next step is to repeat the process for your Live (PROD) website.
This ensures your production environment becomes an identical clone of your Local DDEV Drupal site before you start working with future deployments.
You’ll use the same folder-deployer.sh script — this time selecting the PROD environment.
1. Run the Deployer Script and Select the PROD Environment
In your Local DDEV Drupal project root, run:
./folder-deployer.shYou’ll see the environment selector again:
    ┏━━━━━━━━━━━━━━━━━━━━━━━━━━━━━━━━━━━━━━━━┓
    ┃ ╺┳┓┏━┓╻ ╻┏━┓┏━┓╻    ┏━╸┏━┓╻  ╺┳┓┏━╸┏━┓ ┃
    ┃  ┃┃┣┳┛┃ ┃┣━┛┣━┫┃    ┣╸ ┃ ┃┃   ┃┃┣╸ ┣┳┛ ┃
    ┃ ╺┻┛╹┗╸┗━┛╹  ╹ ╹┗━╸  ╹  ┗━┛┗━╸╺┻┛┗━╸╹┗╸ ┃
    ┃       ╺┳┓┏━╸┏━┓╻  ┏━┓╻ ╻┏━╸┏━┓         ┃
    ┃        ┃┃┣╸ ┣━┛┃  ┃ ┃┗┳┛┣╸ ┣┳┛         ┃
    ┃       ╺┻┛┗━╸╹  ┗━╸┗━┛ ╹ ┗━╸╹┗╸         ┃
    ┗━━━━━━━━━━━━━━━━━━━━━━━━━━━━━━━━━━━━━━━━┛
                  /'''''''''''\
               ~o| ENVIRONMENT |o~
                  \.........../
o-----------------------------------------------o
|   1 - DEV (Development)                       |
|   2 - PROD (Production)                       |
o-----------------------------------------------o
|   Q - Exit                                    |
o-----------------------------------------------o
Select environment: 2
Type 2 and press Enter to select the PROD environment. This opens the main menu for the Live site:
                  /'''''''''\
               ~o| MAIN MENU |o~
                  \........./
o-------------- Environment: PROD --------------o
|   1 - Deploy 'vendor' folder to PROD          |
|   2 - Deploy 'web/modules' folder to PROD     |
|   3 - Deploy 'web/themes' folder to PROD      |
|   4 - Deploy 'web/core' folder to PROD        |
|   5 - Deploy 'web/sites' folder to PROD       |
|   6 - Git pull in PROD                        |
|   7 - Import config in PROD                   |
|   8 - Clear cache in PROD                     |
|   9 - Select Environment (DEV/PROD)           |
o-----------------------------------------------o
|   Q - Exit                                    |
o-----------------------------------------------o

Select a number from the Main Menu:
2. Deploy the vendor Folder to PROD
Start by deploying Composer dependencies. Type 1 and press Enter to select “Deploy ‘vendor’ folder to PROD”.
Skip backup:
Backup current 'vendor' folder? (Yes/No/Cancel = y/n/c)
n
Upload your local vendor folder, select Yes:
Upload local 'vendor' folder? (Yes/No/Cancel = y/n/c)
Y
Enter your shared hosting password:
(youraccount@yourhostingdomain.com) Password:When complete, the script returns to the main menu.
3. Deploy web/modules to the PROD Website
Now push modules (core, contributed, custom). Type 2 and press Enter to select “Deploy ‘web/modules’ folder to PROD”:
Select a number from the Main Menu: 2

Starting deployment of the 'web/modules' folder to PROD (drupal.astralmemories.com)...
Skip the backup:
Backup current modules folder? (Yes/No/Cancel = y/n/c)
n
Upload your local modules folder, select Yes:
Upload local modules folder? (Yes/No/Cancel = y/n/c)
Y
Enter your hosting password again.
4. Deploy web/core to PROD
Next, deploy the ‘web/core’ folder to the PROD website. Type 4 and press Enter to select “Deploy ‘web/core’ folder to PROD”:
Select a number from the Main Menu: 4

Starting deployment of the 'web/core' folder to PROD (drupal.astralmemories.com)...
Skip backup:
Backup current 'web/core' folder? (Yes/No/Cancel = y/n/c)
n
Upload your local ‘web/core’ folder, select Yes:
Upload local 'web/core' folder? (Yes/No/Cancel = y/n/c)
y
Enter your shared hosting password:
(youraccount@yourhostingdomain.com) Password:Verify Drush Connectivity on the PROD Website
SSH into your hosting account and navigate to your PROD site folder:
cd ~/drupal.yourdomain.com/Run:
drush statusYou should see output similar to:
your-user-account@iad1-shared-b7-33:~/drupal.yourdomain.com$ drush status
Drupal version : 11.2.5
Site URI       : http://default
DB driver      : mysql
DB hostname    : yourLiveDBhost
DB port        : 3306
DB username    : yourLiveDBuser
DB name        : yourLiveDBname
PHP binary     : /usr/local/php83/bin/php
PHP config     : /etc/php83/php.ini
PHP OS         : Linux
PHP version    : 8.3.14
Drush script   : /home/your-user-account/drupal.yourdomain.com/vendor/bin/drush.php
Drush version  : 13.6.2.0
Drush temp     : /tmp
Drush configs  : /home/your-user-account/drupal.yourdomain.com/vendor/drush/drush/dru
                sh.yml
Drupal root    : /home/your-user-account/drupal.yourdomain.com/web
Site path      : sites/default
Drupal config  : ../config/sync
your-user-account@iad1-shared-b7-33:~/drupal.yourdomain.com$
This confirms that:
✔ Drush works correctly
✔ Environment variables are loading
✔ PHP is configured
✔ The PROD database credentials are detected
5. Deploy the web/sites Folder to PROD (Files, Images, Assets)
Finally, deploy the file system. Type 5 and press Enter to select “Deploy ‘web/sites’ folder to PROD”:
Select a number from the Main Menu: 5

Starting deployment of the 'web/sites' folder to PROD (drupal.astralmemories.com)...
Skip backup:
Backup current 'web/sites' folder? (Yes/No/Cancel = y/n/c)
n
Upload your local ‘web/sites’ folder, select Yes:
Upload local 'web/sites' folder? (Yes/No/Cancel = y/n/c)
y
Enter your password when prompted.
(youraccount@yourhostingdomain.com) Password:When finished, you will go back to the Deployer script main menu.
Type q and press Enter to exit the script:
Select a number from the Main Menu: q
Exiting...
At this point, all Drupal code, assets, and vendor files are in place on your Live server.
6. Import Your Local Database Into the Live Website
Now that your PROD site has all necessary files, the final step is loading the Local database into production.
Run from the PROD folder:
drush sql:cli < drupaldb_2025-11-07.sql(Replace the filename with your actual SQL dump.)
When the import completes, clear the Drupal cache:
drush cr7. Verify the Live Site in the Browser
Visit your Live site: https://drupal.yourdomain.com
You should now see a complete clone of your Local DDEV Drupal site, running fully on shared hosting:

You’ve now successfully created a full Local → DEV → PROD Drupal workflow using:
- DDEV for local development
- Git for version control
- Drush for CLI operations
- Environment variables for secure credential handling
- A custom Bash deployer script for managing deployments
- Shared hosting (DreamHost Unlimited or similar)
- And a workflow that bypasses common shared-hosting limitations by avoiding Composer on the server
You now have a professional, modern Drupal 10/11 workflow — even on low-cost shared hosting that normally can’t run complex Composer operations.
Conclusion
By following this tutorial from start to finish, you’ve set up a complete and reliable Drupal development workflow that works seamlessly across Local, Development (DEV), and Production (PROD) environments—even on a shared hosting platform with tight resource limitations.
This process achieves something many Drupal developers struggle with when starting out: a workflow that is simple, secure, repeatable, and predictable, without relying on expensive hosting or complex DevOps tooling.
Here’s what you accomplished:
✔ Built a modern local development environment using DDEV
You created a fully isolated Drupal environment with matching PHP/MySQL versions, giving you faster iteration and complete control over your development setup.
✔ Prepared two remote environments (DEV and LIVE)
You configured fresh DreamHost site directories, databases, PHP versions, SSH access, and folder structures—creating a solid foundation for multi-environment Drupal development.
✔ Implemented best practices inside settings.php
You migrated your sync directory, switched to environment variable–based database credentials, and added secure, per-environment hash salts.
✔ Enabled Drush and PHP version consistency across environments
Through .bash_profile configuration and environment-variable loading, your shared hosting server now behaves much more like a modern CLI-ready Drupal environment.
✔ Created and used a custom deployment script
Your Bash deployer script allows you to:
- Deploy specific folders (vendor, modules, themes, core, sites)
- Run Drush commands remotely
- Safely back up and sync code
- Move changes from Local → DEV → PROD with simple menu options
This script turns a tedious, error-prone workflow into a streamlined, predictable system.
✔ Cloned your local Drupal site into both DEV and PROD
By exporting your local database and importing it into both remote sites, you created full working clones of your local environment—ensuring consistency across the entire development pipeline.
You Now Have a Complete Local → DEV → PROD Drupal Workflow
With everything in place, you can:
- Develop confidently on your local machine
- Test safely in a controlled DEV environment
- Deploy to production with repeatable, reliable steps
- Sync changes easily without running Composer on shared hosting
- Maintain environment parity and avoid configuration drift
You now have a foundation you can extend, customize, and improve over time—whether you want to enhance your deployer script, add automatic backups, integrate frontend build steps, or move toward a more advanced CI/CD setup in the future.